
Introduction
The first time I made stuffing meatloaf was a complete accident. It was one of those hectic Tuesday evenings – soccer practice had run late, homework was piling up, and I’d completely forgotten to defrost anything for dinner. As I frantically searched my pantry, I spotted a box of Stovetop stuffing next to my ground beef in the fridge. Something clicked, and I thought, “Why not?” Little did I know this desperate weeknight experiment would become one of our family’s most requested meals!
Have you ever discovered a recipe so simple yet so delicious that it becomes an instant family classic? That’s exactly what happened with this stuffing meatloaf in our household. I’ve been making it for years now, tweaking and perfecting it along the way. Trust me when I say this isn’t your grandmother’s dry, bland meatloaf – this version is moist, flavorful, and comes together in a fraction of the time.
Let me tell you a secret: I tried this recipe 7 different ways before landing on this perfect version. The stuffing mix doesn’t just add flavor – it replaces the breadcrumbs and many of the seasonings you’d normally need to measure out individually. It’s a brilliant shortcut that doesn’t sacrifice taste!
Table of Contents
Ingredients List
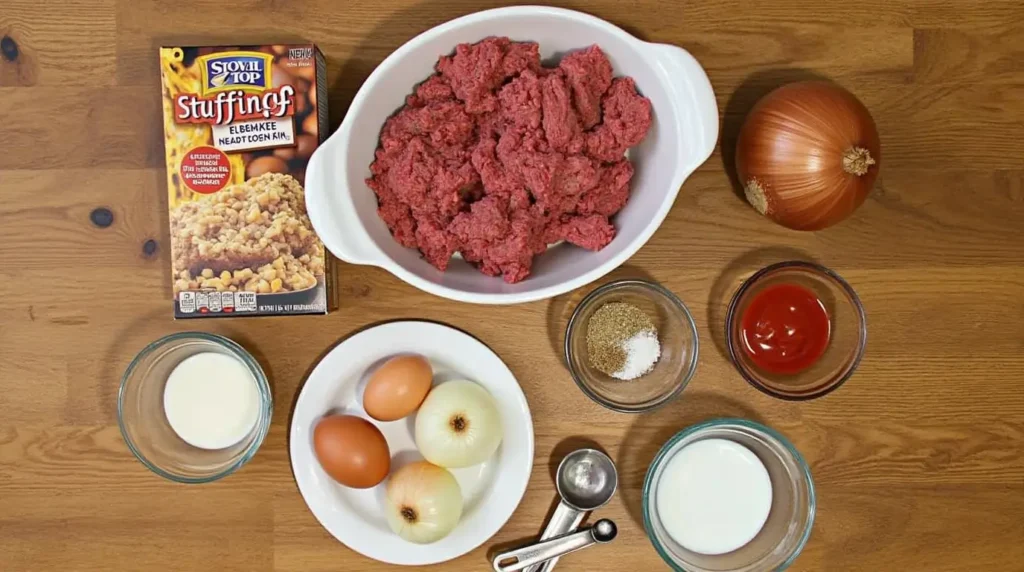
For this stuffing meatloaf, you’ll need:
- 2 pounds ground beef (I use 85/15 lean-to-fat ratio – the bit of fat keeps it juicy!)
- 1 box (6 oz) Stovetop stuffing mix (I prefer the savory herbs variety, but any flavor works)
- 1 cup water
- 2 eggs, lightly beaten
- 1/2 cup diced onion (sweet onions from my local farmers market add the best flavor)
- 1/2 cup diced bell pepper (I use a mix of red and green for color and sweetness)
- 2 cloves garlic, minced (or 1 teaspoon garlic powder in a pinch)
- 1/4 cup ketchup, plus extra for topping
- 1 tablespoon Worcestershire sauce
- 1/2 teaspoon black pepper
- 1/4 teaspoon salt (I use kosher salt that my sister brought me from a specialty shop in Chicago)
For the glaze:
- 1/2 cup ketchup
- 2 tablespoons brown sugar
- 1 tablespoon yellow mustard
- 1 teaspoon apple cider vinegar (I started using this after running out of white vinegar once – happy accidents!)
You’ll notice that unlike traditional meatloaf, there’s no need to add extra herbs or breadcrumbs – the stuffing mix takes care of all that! When you open the stuffing package, you’ll immediately smell that comforting, herby aroma that promises good things to come.
Timing
- Preparation time: 15 minutes (I can get this down to 10 minutes when I’m really in a hurry!)
- Cooking time: 50-60 minutes
- Total time: About 1 hour and 15 minutes
This stuffing meatloaf has saved me on countless busy weeknights. I typically prep it while my kids are finishing homework, and by the time everyone’s hungry, dinner is ready! It’s become my go-to for Thursdays when both my kids have after-school activities and we’re all running on empty.
My favorite time-saving trick? I often chop extra onions and peppers on Sunday evenings when I’m meal prepping for the week. Having them ready to go cuts the prep time almost in half!
Step-by-Step Instructions
Step 1: Prepare Your Ingredients
Preheat your oven to 375°F and lightly grease a 9×5 inch loaf pan. I like to line mine with parchment paper with a bit hanging over the sides – this makes removing the meatloaf so much easier later!
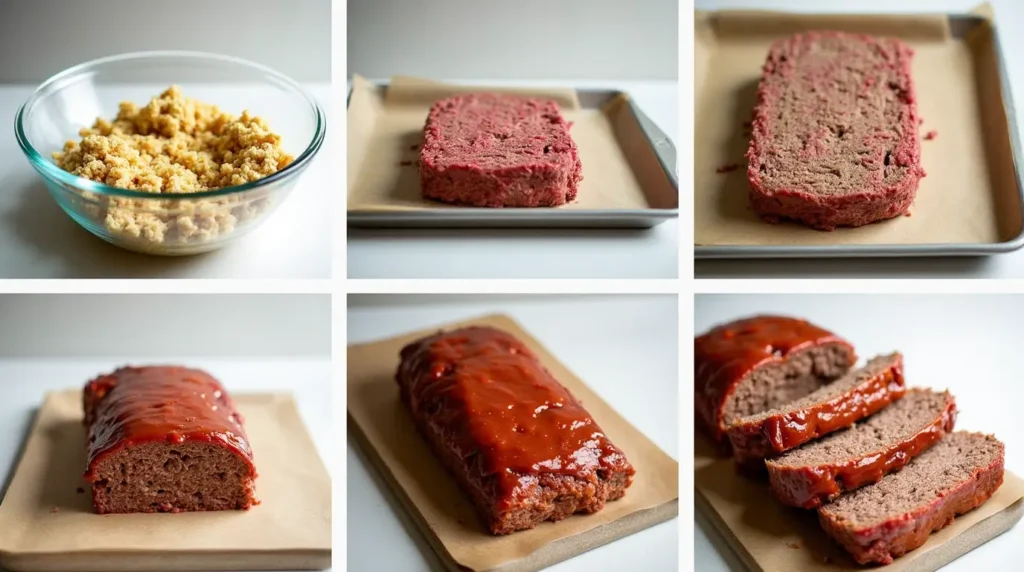
In a small bowl, combine the stuffing mix with 1 cup of water. Set it aside for about 5 minutes to soften. The first time I made this recipe, I skipped this step and the stuffing stayed too crunchy. Trust me, allowing it to soak makes all the difference in the world!
Step 2: Sauté the Vegetables
In a small skillet, heat a teaspoon of olive oil over medium heat. Add the diced onions and peppers, cooking until just softened – about 3-4 minutes. Add the minced garlic and cook for another 30 seconds until fragrant.
I learned this trick from my mother-in-law: sautéing the vegetables before adding them to the meatloaf mixture removes their raw edge and brings out their natural sweetness. It’s an extra step, but so worth the few minutes it takes!
Step 3: Mix the Meatloaf
In a large bowl, gently combine the ground beef, softened stuffing mixture, beaten eggs, sautéed vegetables, 1/4 cup ketchup, Worcestershire sauce, salt, and pepper.
Here’s where I made my biggest mistake when I first started making stuffing meatloaf – I used to mix everything with a spoon until it was completely uniform. Now I know better! Use your hands (yes, it’s messy, but so worth it) and mix just until combined. Overmixing makes the meatloaf tough, so channel your inner gentle touch here.
Step 4: Shape and Prepare for Baking
Transfer the mixture to your prepared loaf pan, gently pressing it into an even layer. Don’t pack it down too tightly – another lesson I learned the hard way after serving a brick-like meatloaf to my poor family years ago!
For the glaze, mix together the 1/2 cup ketchup, brown sugar, mustard, and apple cider vinegar in a small bowl until smooth. Spread this mixture evenly over the top of the meatloaf.
My kids always try to sneak a taste of this glaze – it’s tangy-sweet perfection that caramelizes beautifully in the oven!
Step 5: Bake to Perfection
Bake the stuffing meatloaf in your preheated oven for 50-60 minutes, or until the internal temperature reaches 160°F when tested with a meat thermometer.
I can’t stress enough how important a meat thermometer is here! Before I got mine, I was constantly second-guessing whether the meatloaf was done, often cutting into it prematurely (and making a mess) or overcooking it to be safe.
Step 6: Rest Before Serving
Once done, let the meatloaf rest for at least 10 minutes before slicing. I know it’s tempting to dig right in – the amazing aroma filling your kitchen will have everyone hovering! – but this resting time allows the juices to redistribute, ensuring each slice stays moist.
Nutritional Information
As someone who believes in balanced meals for my family, I try to be mindful of nutritional content while still prioritizing flavor. Here’s the approximate nutritional breakdown per serving (assuming 8 servings per loaf):
- Calories: 320
- Protein: 24g
- Carbohydrates: 17g
- Fat: 18g (7g saturated)
- Fiber: 1g
- Sodium: 670mg
I always pair this stuffing meatloaf with vegetables to round out the meal. My kids don’t even realize they’re getting a balanced dinner – they’re too busy enjoying the meatloaf!
Healthier Alternatives for the Recipe
While this stuffing meatloaf is already a simplified version of a classic, there are several ways to make it even healthier:
- Swap the ground beef for ground turkey or chicken. When my sister was on a health kick last year, I made this switch for Sunday dinner at her house. Everyone was surprised at how delicious the turkey version turned out! If using turkey, I recommend adding an extra tablespoon of Worcestershire sauce to enhance the flavor.
- Use low-sodium stuffing mix and ketchup. When my dad was put on a low-sodium diet last year, I started experimenting with reduced-sodium alternatives. The difference in taste is minimal, but it makes a big difference health-wise!
- Add extra vegetables. Sometimes I’ll sneak in shredded zucchini or carrots – they blend right in and add nutrition without changing the flavor profile that my family loves. My son, who claims to hate zucchini, has never once noticed it in this meatloaf!
- For a gluten-free option, replace the stuffing mix with 1 cup of cooked quinoa and 1 tablespoon of Italian seasoning. My neighbor’s daughter has celiac disease, and this was the variation I created for their family dinner. It became their new favorite!
Serving Suggestions
This stuffing meatloaf is incredibly versatile when it comes to side dishes! Here are some of our family favorites:
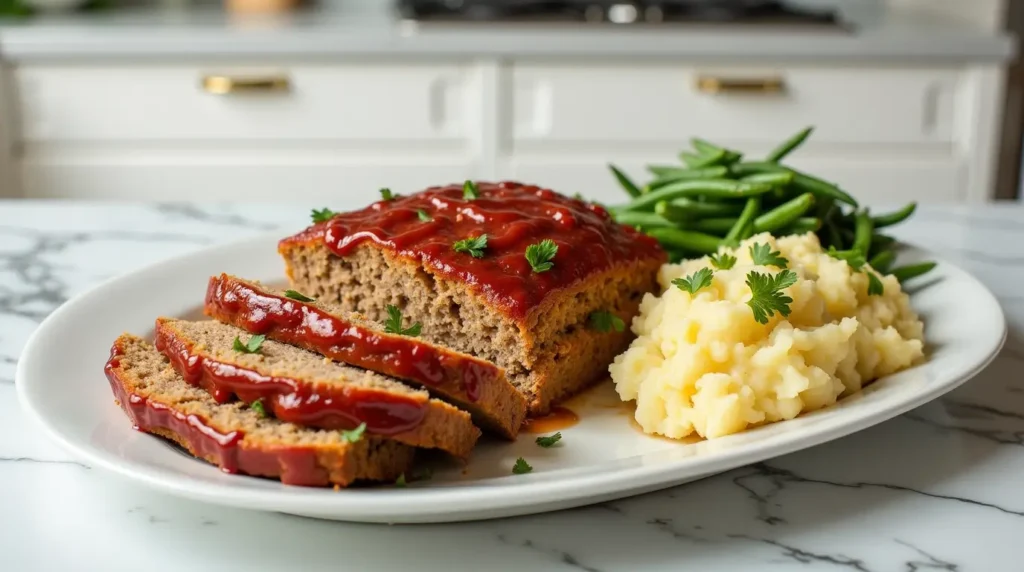
- Classic mashed potatoes and green beans – my husband’s requested birthday dinner every year!
- Roasted sweet potatoes and a side salad for a lighter option
- Steamed broccoli with a sprinkle of parmesan cheese – even my veggie-resistant 9-year-old will eat this combination
- Buttered egg noodles with peas – my grandmother’s favorite way to serve meatloaf
- Dinner rolls to soak up that delicious glaze (the corner pieces of meatloaf with extra glaze are always fought over in our house!)
For special occasions like our annual neighborhood potluck, I sometimes make mini meatloaves in a muffin tin. They cook faster (about 25-30 minutes), and everyone gets those coveted end pieces with extra glaze!
Common Mistakes to Avoid
Over my years of making stuffing meatloaf, I’ve made pretty much every mistake possible. Let me save you the trouble:
- Skipping the vegetable sauté: Raw onions and peppers release moisture during cooking, which can make your meatloaf soggy. The first time I made this recipe, I skipped this step and ended up with a puddle around my meatloaf!
- Overmixing the meat: I used to think thorough mixing was best, until my mother-in-law watched me making this one Sunday and gently suggested I was “working that meat to death.” She was right – gentle mixing keeps the texture tender.
- Not letting the stuffing hydrate: Patience pays off here. Let those stuffing crumbs soak up the water fully before adding them to your meat mixture.
- Taking it straight from oven to table: The first time I made this for company, I was running late and sliced it immediately after taking it out of the oven. What a mess! The 10-minute rest is crucial for clean slices.
- Using lean meat only: I once tried making this with 97% lean ground beef because it was on sale. Big mistake! The meatloaf was dry despite the stuffing. Stick with 85/15 or even 80/20 for the best results.
Storing Tips for the Recipe
Stuffing meatloaf actually tastes even better the next day, making it perfect for meal prep! Here’s how I handle leftovers:
For refrigerating: Once completely cooled, store sliced or unsliced meatloaf in an airtight container for up to 4 days. I love making this on Sunday for Monday’s dinner – something about letting those flavors meld overnight makes it even more delicious!
For freezing: This meatloaf freezes beautifully! I often make a double batch and freeze one (either whole or pre-sliced) for future easy dinners. Wrap it tightly in plastic wrap, then foil, and freeze for up to 3 months. My sister-in-law had her third baby last month, and a frozen stuffing meatloaf was part of the meal train I organized for her family.
Reheating: For refrigerated leftovers, I microwave slices for about 1-2 minutes or reheat in a 350°F oven for about 10 minutes. For frozen meatloaf, thaw overnight in the refrigerator before reheating, or reheat from frozen in a 325°F oven for about 1 hour until heated through.
My favorite leftover hack? Stuffing meatloaf sandwiches! A slice between two pieces of bread with a little extra ketchup makes the BEST lunch the next day.
FAQs
Can I make this stuffing meatloaf ahead of time?
Absolutely! Just last month, Sarah from Ohio asked me this same question. You can prepare the entire meatloaf up to 24 hours ahead, cover it tightly with plastic wrap, and refrigerate until you’re ready to bake. Just add about 5-10 minutes to the cooking time if you’re baking it straight from the refrigerator.
My family doesn’t like bell peppers. Can I leave them out?
Lisa from Atlanta mentioned her kids pick around peppers too! You can definitely omit them or substitute with finely diced carrots or celery for a similar texture without the pepper flavor. My niece hates visible peppers but never notices when I grate them super fine on a cheese grater!
Can I use a different flavor of stuffing mix?
Absolutely! Tom from Washington wrote to tell me he uses the cornbread variety and loves it. I’ve tried chicken, turkey, and pork varieties – they all work beautifully and each brings a slightly different flavor profile. The holidays are a great time to experiment with the seasonal stuffing flavors that appear on shelves!
My meatloaf always falls apart when I slice it. What am I doing wrong?
This is exactly what happened to me when I served it at my daughter’s basketball team dinner! The likely culprit is not allowing it to rest long enough after baking. Give it at least 10 minutes (15 is even better) before slicing. Also, make sure you’re using the correct ratio of binders (eggs) to meat.
Is there a way to make individual servings?
Yes! Many of my readers with smaller households, like Jenny from Maine, make this recipe in muffin tins for perfect individual portions. Just reduce the cooking time to about 25-30 minutes and check the internal temperature to ensure they reach 160°F.
Conclusion
This stuffing meatloaf has been a lifesaver in my busy household, combining simplicity with incredible flavor. The stuffing mix does double duty – adding herbs, spices, and breadcrumbs in one convenient package. From last-minute weeknight dinners to comfort food Sunday suppers, this recipe has earned its place in our family’s regular rotation.
I’m eager to hear about your experiences with this recipe! Did you try one of the variations? Did your family love it as much as mine does? Share your photos with me or leave a comment below.
If you enjoyed this stuffing meatloaf recipe, be sure to subscribe to my newsletter for more family-friendly meals that don’t sacrifice flavor for convenience. And remember – even on the busiest nights, gathering around a homemade meal creates memories that last far longer than the time it takes to prepare it!