
Introduction: My Love Affair with Beef Steak Chili
Have you ever tasted something that instantly transported you back to childhood? That’s exactly what happens whenever I make this beef steak chili recipe. Growing up in Colorado, my dad would make his famous chili every Sunday during football season. The rich aroma would fill our home, drawing everyone to the kitchen like moths to flame.
What makes this beef steak chili so special isn’t just the tender chunks of steak instead of ground beef – it’s the perfect balance of heat, smokiness, and richness that creates pure comfort in a bowl. Trust me, once you try this version, you might never go back to regular chili again!
Table of Contents
Ingredients List

For this hearty beef steak chili recipe, you’ll need:
- 2 pounds beef chuck, cut into ½-inch cubes (I find the best cuts at Wilson’s Butcher Shop near my house – their grass-fed beef has incredible flavor)
- 3 tablespoons olive oil
- 2 medium onions, diced (sweet onions work wonderfully here)
- 4 garlic cloves, minced (the fresher the better – the aroma when these hit the hot oil is absolutely divine!)
- 2 red bell peppers, diced
- 2 jalapeño peppers, seeded and finely diced (leave some seeds in if you like heat – my husband loves it spicy, but the kids prefer it milder)
- 3 tablespoons chili powder (I use the one I discovered at a small spice shop in Santa Fe last summer)
- 2 tablespoons ground cumin
- 1 tablespoon smoked paprika (this adds that gorgeous smokiness that reminds me of campfire cooking)
- 1 teaspoon dried oregano
- 1 teaspoon cayenne pepper (adjust to your heat preference)
- 1 tablespoon unsweetened cocoa powder (my dad’s secret ingredient!)
- 1 can (28 oz) crushed tomatoes
- 1 can (14 oz) diced fire-roasted tomatoes
- 2 cans (15 oz each) kidney beans, drained and rinsed (or mix kidney and black beans like I often do)
- 2 cups beef broth (homemade is best, but a good-quality store-bought works too)
- 1 tablespoon brown sugar
- Salt and freshly ground black pepper to taste
Optional Toppings:
- Shredded cheddar cheese
- Sour cream or Greek yogurt
- Sliced green onions
- Fresh cilantro, chopped
- Diced avocado
- Lime wedges
- Crushed tortilla chips
Possible Substitutions:
- For a leaner option, try using sirloin instead of chuck
- Red kidney beans can be swapped for black beans or pinto beans
- For vegetable variety, add diced zucchini or carrots (my daughter’s favorite addition)
- Ground turkey can replace beef for a lighter version, though the flavor profile will change
When you open that jar of smoked paprika, you’ll immediately catch its deep, woodsy aroma – it’s the scent that always signals to my family that chili night is coming!
Timing
Preparation time: 30 minutes (I usually chop all my vegetables while catching up on my favorite podcast) Cooking time: 2 hours 30 minutes (the longer it simmers, the more the flavors meld – patience is key!) Total time: 3 hours
This beef steak chili recipe is my go-to for Sunday afternoon cooking. I start it around 2 PM, which gives it plenty of time to simmer and develop those complex flavors before dinner. The best part? This chili actually tastes even better the next day, so I often make it when I know we have a busy Monday ahead.
I’ve found that this recipe fits perfectly into my weekend meal prep routine. While the chili simmers, I can prepare lunches for the week or help the kids with homework. The hands-off cooking time is what makes this dish so practical for my busy household.
Step-by-Step Instructions
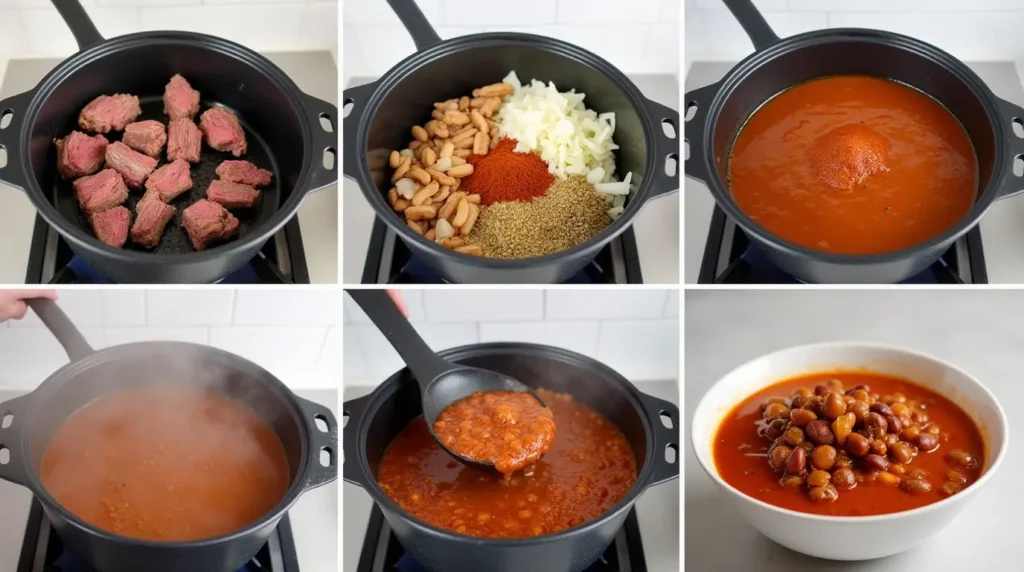
Step 1: Prepare the Beef
Season the beef cubes generously with salt and pepper. Heat 2 tablespoons of olive oil in a large Dutch oven or heavy-bottomed pot over medium-high heat until shimmering. Working in batches (don’t crowd the pan – a mistake I made for years!), brown the beef on all sides, about 3-4 minutes per batch. Transfer the browned meat to a plate.
The first time I made this recipe, I rushed this step and threw all the meat in at once. Trust me, taking your time here creates those beautiful caramelized flavors that make this chili exceptional. That deep browning is what gives the finished dish its rich, complex taste.
Step 2: Sauté the Aromatics
Add the remaining tablespoon of oil to the pot. Add the diced onions and cook until softened, about 5 minutes. Add the garlic and cook until fragrant, about 30 seconds (be careful not to burn the garlic – it goes from perfect to bitter in seconds, as I’ve learned the hard way!).
Step 3: Add the Peppers and Spices
Add the bell peppers and jalapeños to the pot and cook until slightly softened, about 5 minutes. Stir in the chili powder, cumin, smoked paprika, oregano, cayenne pepper, and cocoa powder. Cook, stirring constantly, for about 1 minute until the spices become fragrant.
I remember the first time my grandmother saw me add cocoa powder to chili – she thought I’d lost my mind! But once she tasted the depth it added, she became a convert. It doesn’t make the chili taste like chocolate; it just adds this wonderful richness that balances the acidity of the tomatoes.
Step 4: Combine All Ingredients
Return the browned beef to the pot along with any accumulated juices. Add the crushed tomatoes, diced tomatoes, kidney beans, beef broth, and brown sugar. Stir well to combine, making sure to scrape up any browned bits from the bottom of the pot – those little bits are flavor gold!
Step 5: Simmer
Bring the chili to a boil, then reduce the heat to low. Cover and simmer, stirring occasionally, for at least 2 hours until the beef is tender and the flavors have melded together. For even more tender beef, you can simmer for up to 3 hours.
During the last 30 minutes of cooking, remove the lid to allow the chili to thicken to your desired consistency. This is something my mom always insisted on – “Never serve watery chili!” I can still hear her voice when I’m in the kitchen.
Step 6: Final Seasoning
Taste and adjust the seasoning with additional salt, pepper, or cayenne as needed. The flavors will continue to develop as the chili sits, so don’t be afraid to make it a day ahead of time.
Nutritional Information
I believe in knowing what goes into your body, which is why I always include nutritional information for my recipes. As someone who tries to balance protein and carbs in every meal, I appreciate when others share this information too!
Per Serving (approximately 1.5 cups):
- Calories: 375
- Protein: 32g
- Carbohydrates: 28g
- Fiber: 9g
- Sugar: 8g
- Fat: 16g
- Saturated Fat: 5g
- Cholesterol: 75mg
- Sodium: 620mg
- Potassium: 1185mg
- Iron: 6mg
This beef steak chili recipe is particularly high in protein, which makes it fantastic for active families like mine. After my son’s basketball games, this is exactly the kind of nutritious, filling meal that satisfies his teenage appetite while providing quality nutrition.
Healthier Alternatives for the Recipe
While this beef steak chili recipe is already packed with nutritious ingredients, there are several ways to make it even healthier:
- Lean Protein Option: Substitute the beef chuck with lean sirloin or even bison for less fat while maintaining high protein content. When my husband was focusing on heart health last year, we made this switch and were pleasantly surprised that it didn’t sacrifice flavor!
- Lower Sodium Version: Use low-sodium beef broth and no-salt-added canned tomatoes and beans. You can add flavor with extra herbs and spices instead. This was a game-changer when my dad needed to reduce his sodium intake.
- Vegetable Boost: Double the bell peppers and add diced zucchini, carrots, or sweet potatoes for extra nutrients and fiber. My kids don’t even notice the extra veggies when they’re immersed in all these delicious flavors!
- Bean Variation: Use all black beans instead of kidney beans for additional antioxidants. When my sister discovered she was slightly anemic, we incorporated more black beans into our family recipes for the added iron.
- Dairy-Free Toppings: Replace sour cream with avocado or dairy-free yogurt. After discovering my youngest had a mild sensitivity to dairy, I started offering multiple topping options, and now everyone in the family customizes their bowl exactly how they like it.
Serving Suggestions
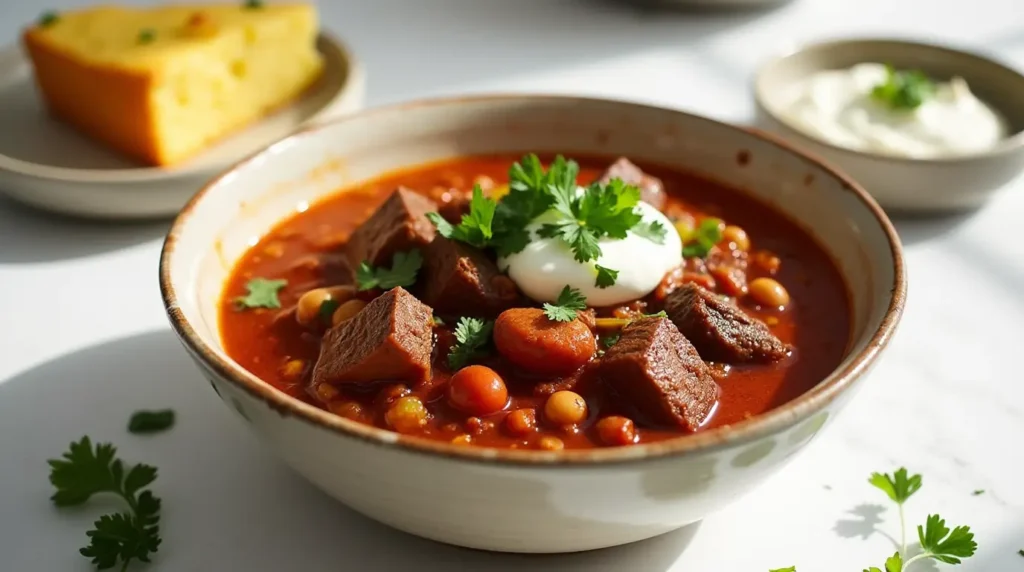
Afficher l’image
This hearty beef steak chili shines as a standalone dish, but there are so many delicious ways to serve it:
- Classic Comfort: Serve in deep bowls topped with shredded cheddar cheese, a dollop of sour cream, and sliced green onions. This is how we enjoy it during our Friday night family movie nights.
- Tex-Mex Style: Serve over a small portion of brown rice or quinoa with diced avocado, fresh cilantro, and a squeeze of lime. I first tried this combination when visiting my cousin in Austin, and it’s become a regular in our rotation.
- Game Day Special: Set up a chili bar with all the toppings and let everyone customize their own bowl. This was the highlight of our Super Bowl party last year – even my picky nephew went back for seconds!
- Cornbread Companion: Nothing complements this beef steak chili better than a slice of homemade cornbread. During harvest season, I add fresh corn kernels to the cornbread batter using corn from our local farmer’s market – it’s absolutely divine!
- Loaded Baked Potato: Ladle the chili over a baked potato for a filling, satisfying meal. This was my go-to dinner solution during those hectic weeks when the kids had different after-school activities every night.
- Breakfast Twist: Try leftover chili topped with a fried egg for a protein-packed breakfast that will keep you fueled until lunch. My husband discovered this combination accidentally one morning, and now it’s his favorite weekend breakfast!
Common Mistakes to Avoid
After years of chili-making (and plenty of learning experiences!), here are the pitfalls to watch out for:
- Skipping the browning step: I once tried to save time by tossing raw beef directly into the pot. Big mistake! Properly browning the meat creates deep, rich flavors that form the foundation of an exceptional chili.
- Using pre-ground spices that are too old: Spices lose their potency over time. I mark all my spice jars with purchase dates after learning this lesson the hard way when my chili turned out bland despite adding what seemed like the right amount of seasonings.
- Cooking at too high a temperature: The first time I made this recipe in my college apartment, I was impatient and kept the heat too high. The bottom burned while the meat remained tough. Low and slow is the secret to tender beef and well-developed flavors!
- Not tasting as you go: Chili is all about balance. I remember making a batch for my in-laws without tasting along the way, and it ended up way too spicy! Now I always adjust seasonings gradually and taste throughout the cooking process.
- Serving immediately after cooking: While it’s tempting to dig in right away, chili is one of those magical dishes that improves with time. Whenever possible, I make it a day ahead – the flavor transformation is remarkable!
Storing Tips for the Recipe
This beef steak chili recipe makes excellent leftovers, and proper storage ensures you’ll enjoy every last bite:
- Refrigerator Storage: Cool the chili completely before transferring to airtight containers. It will keep in the refrigerator for up to 4 days. In my household, I portion leftovers into individual containers for quick grab-and-go lunches.
- Freezer Method: This chili freezes beautifully for up to 3 months. I learned a great tip from my mother-in-law to freeze it in silicone muffin cups, then transfer the frozen portions to freezer bags – perfect for single servings!
- Reheating Tips: Reheat gently on the stovetop over medium-low heat, adding a splash of beef broth if needed to reach desired consistency. The microwave works in a pinch, but the stovetop method preserves the texture better.
- Meal Prep Strategy: Every other Sunday, I make a double batch of this chili – we enjoy it for dinner that night, have leftovers during the week, and freeze portions for busy nights when cooking from scratch isn’t possible.
- Topping Storage: If you’re prepping a chili bar for entertaining, store each topping separately and refrigerate until serving time. I learned this after my disastrous book club gathering where I pre-mixed toppings – everything got soggy!
FAQs
Can I make this beef steak chili recipe in a slow cooker?
Absolutely! Sarah from Minnesota recently asked me this same question. Brown the meat and sauté the aromatics as directed, then transfer everything to your slow cooker. Cook on low for 7-8 hours or on high for 4-5 hours until the beef is tender. I often use this method when I know I’ll be running errands all day but want dinner ready when I get home.
Is it necessary to use both kidney beans and black beans?
Not at all! Jennifer from Seattle wondered about bean substitutions, and I assured her that using all of one type works perfectly. My husband prefers all kidney beans, while I like the mix. Use what your family enjoys or what you have on hand – this recipe is wonderfully flexible!
My chili seems too thin. How can I thicken it?
This is a common question I get, most recently from Mike in Chicago. If your chili is too thin, remove the lid during the last 30-45 minutes of cooking to allow excess liquid to evaporate. Alternatively, you can mash some of the beans against the side of the pot to release their starch, which naturally thickens the chili.
Can I make this chili less spicy for my kids?
Definitely! Amanda from Florida was concerned about the heat level for her young children. Simply reduce or omit the cayenne pepper and jalapeños. You can always set out hot sauce at the table for adults who want to add heat to their individual portions. This is exactly what I do for my family – mild in the pot, with heat options on the side.
How do you get the beef so tender?
Tom from Denver asked me this after trying the recipe. The key is choosing the right cut (chuck has great marbling), cutting uniform pieces, browning properly, and simmering low and slow. Don’t rush the process – those two hours of gentle simmering transform tough meat into melt-in-your-mouth tenderness.
Conclusion
This simple and satisfying beef steak chili recipe loaded with protein has been my family’s comfort food cornerstone for years. With tender chunks of beef, warming spices, and that special touch of cocoa powder, it delivers incredible depth of flavor in every spoonful. Whether you’re feeding a hungry family, meal prepping for the week, or hosting a game day gathering, this versatile dish never disappoints.