
My Kitchen Confession: The Round Steak That Changed Everything
Have you ever had one of those cooking moments where you question everything you thought you knew? That was me, standing in my kitchen at 9 PM, staring at yet another tough, chewy piece of meat. But here’s the thing about round steak – it’s actually one of the most rewarding cuts to master once you understand its secrets. After seven attempts (yes, seven!), countless conversations with my butcher friend Mike, and one enlightening chat with my neighbor’s grandmother who’d been cooking for sixty years, I finally cracked the code.
Now, pan seared round steak is one of my family’s most requested meals, and I’m about to share every single trick I’ve learned along the way. Trust me, once you master this technique, you’ll never look at this affordable cut the same way again.
Ingredients You’ll Need (Serves 4)
Here’s what goes into my foolproof pan seared round steak recipe. I’ve included some personal notes about where I source these ingredients and why each one matters:
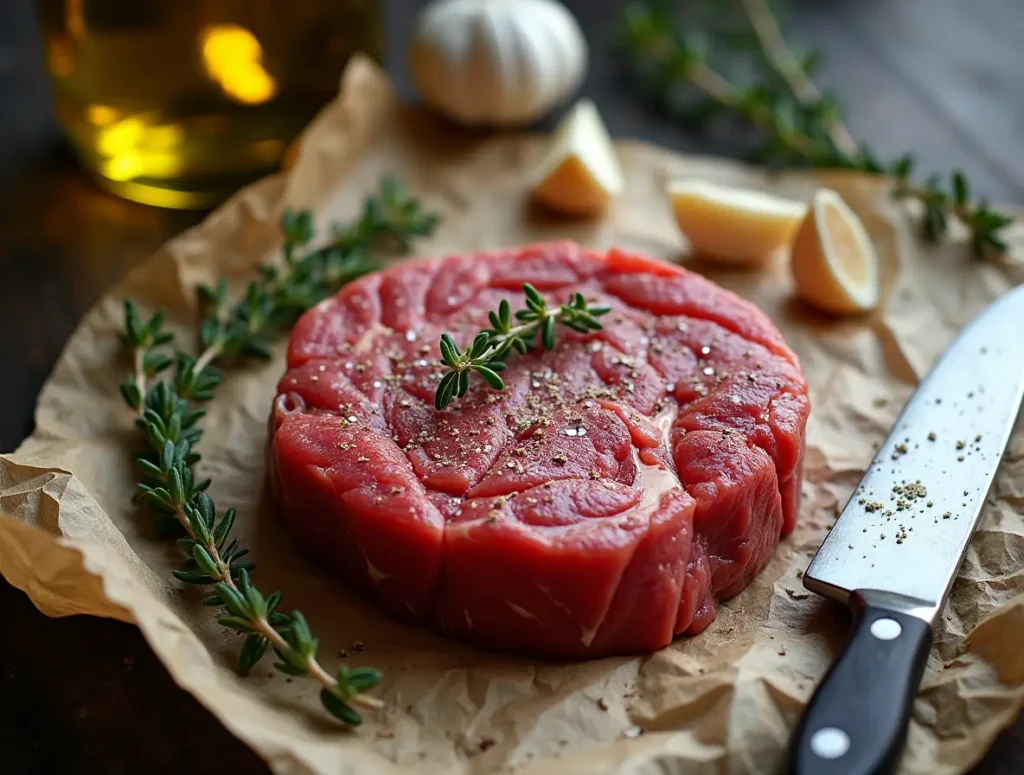
For the Steak:
- 2 lbs top round steak, cut into 4 individual portions (about ½ inch thick)
- 2 tablespoons kosher salt (I use Diamond Crystal – it’s what my culinary school friends swear by)
- 1 tablespoon freshly cracked black pepper
- 2 tablespoons all-purpose flour (for that golden crust we’re after)
- 3 tablespoons vegetable oil (or avocado oil if you want to be fancy)
- 2 tablespoons butter (European-style butter makes a difference, but regular works too)
For the Pan Sauce:
- 1 medium yellow onion, thinly sliced (I get mine from Johnson’s Farm Stand every Saturday morning)
- 3 cloves garlic, minced (the smell when this hits the hot pan is absolutely divine)
- 1 cup beef broth (low-sodium, because we’re controlling the salt ourselves)
- 2 tablespoons Worcestershire sauce (this is my secret weapon for depth of flavor)
- 1 tablespoon fresh thyme leaves (or 1 teaspoon dried – I grow thyme in my kitchen herb garden)
- 1 bay leaf (remove before serving, learned that the hard way!)
Substitution Notes: If you can’t find top round, eye of round works beautifully too. For a gluten-free version, swap the all-purpose flour for rice flour or cornstarch. And here’s a trick I learned from my friend Sarah who follows a dairy-free diet – you can replace the butter with an extra tablespoon of oil and get nearly the same results.
Timing: Planning Your Perfect Pan Seared Round Steak
Prep Time: 15 minutes (plus 30 minutes for salting) Cook Time: 20 minutes Total Time: 1 hour and 5 minutes
Let me share my Sunday meal prep secret: I actually salt my round steaks on Sunday afternoon and let them sit in the refrigerator until Tuesday or Wednesday dinner. This gives the salt time to work its magic, breaking down those tough muscle fibers. It’s a game-changer that I wish I’d known years ago!
For busy weeknight cooking, you can get away with salting the meat 30 minutes before cooking, but if you have the time, longer is always better. I usually start this process when I’m cleaning up from lunch – it takes two minutes to salt the steaks and pop them back in the fridge.
Step 1: Salt Your Steak Like You Mean It

This is where most people go wrong with round steak, and honestly, it’s where I went wrong for years. Generously salt both sides of your steaks and let them sit at room temperature for 30 minutes (or in the fridge for up to 24 hours if you’re meal prepping like I do).
The salt isn’t just for flavor – it’s actually breaking down the proteins and helping to tenderize this naturally tough cut. I learned this from watching my butcher friend Mike prepare steaks for his family. He told me, “Bella, treat that salt like it’s medicine for tough meat,” and he wasn’t kidding!
Step 2: Get Your Seasonings Right
After the salting time is up, pat your steaks completely dry with paper towels. This step is crucial for getting that beautiful golden crust we’re after. Season both sides with freshly cracked black pepper, then lightly dust with flour. The flour helps create an incredible crust and will thicken our pan sauce later.
Pro tip from my own kitchen disasters: Don’t skip the drying step! The first time I made this recipe, I was in a hurry and skipped patting the meat dry. Instead of a gorgeous sear, I got a sad, gray piece of meat that steamed in its own juices. Trust me, those extra 30 seconds with the paper towels make all the difference.
Step 3: Heat Your Pan to Perfection
Heat your vegetable oil in a large, heavy-bottomed skillet (cast iron is my preference) over medium-high heat. You’ll know it’s ready when a drop of water sizzles and evaporates immediately. This usually takes about 3-4 minutes.
Here’s something I learned the hard way: don’t use your highest heat setting. I used to crank my burner to high, thinking it would give me a better sear, but all it did was burn the outside while leaving the inside tough. Medium-high gives you that perfect balance of a golden crust without overcooking.
Step 4: Sear Like a Pro
Carefully place your seasoned steaks in the hot oil. You should hear an immediate sizzle – music to any cook’s ears! Don’t move them for 3-4 minutes. I know it’s tempting to peek and poke, but resist the urge. Let that crust develop.
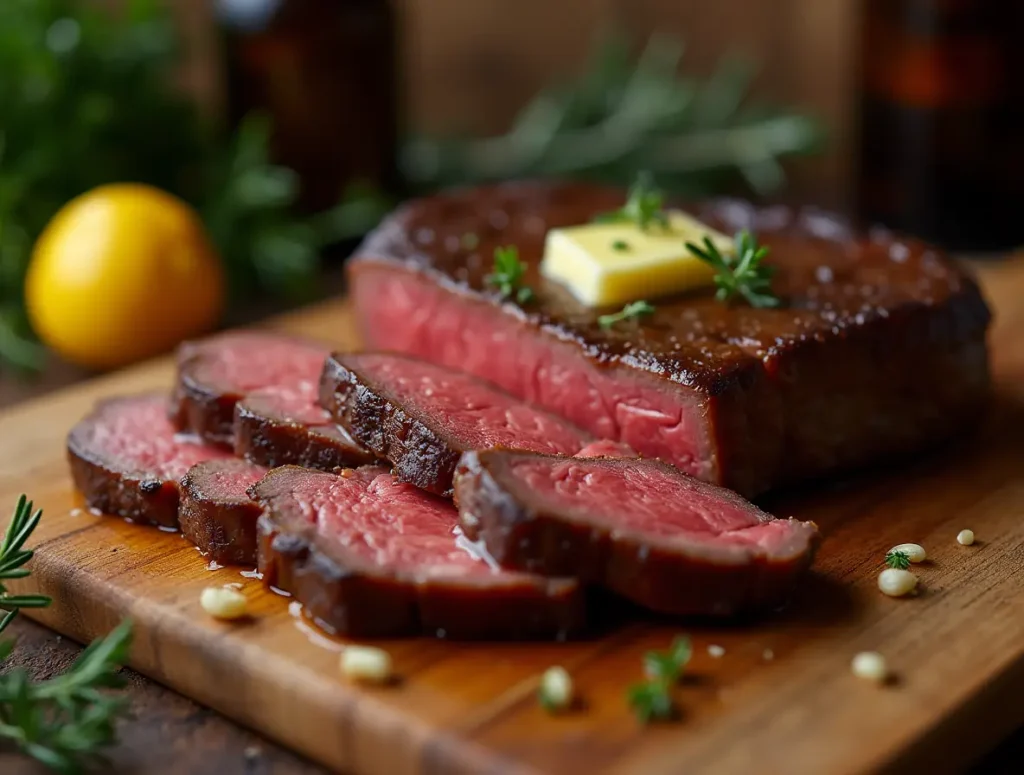
Flip the steaks and sear the other side for another 3-4 minutes. The internal temperature should reach 135°F for medium-rare, which is perfect for round steak. Any higher and you’ll be back to that shoe-leather texture we’re trying to avoid.
Remove the steaks to a plate and tent with foil. They’ll continue cooking slightly from residual heat while we make our incredible pan sauce.
Step 5: Create Magic with the Pan Sauce
Here’s where the real magic happens. Add butter to the same pan (don’t clean it – all those browned bits are pure flavor gold). Add your sliced onions and cook for 2-3 minutes until they start to soften and turn golden.
Add the minced garlic and cook for just 30 seconds until fragrant. Be careful not to burn it – garlic goes from perfectly aromatic to bitter in a heartbeat. I learned this lesson while multitasking during my son’s virtual school day last year!
Step 6: Deglaze and Simmer
Pour in the beef broth, Worcestershire sauce, and add your thyme and bay leaf. Use a wooden spoon to scrape up all those beautiful browned bits from the bottom of the pan. This is called deglazing, and it’s where so much of our flavor comes from.
Let this simmer for 5-7 minutes until it reduces by about half. The sauce should coat the back of a spoon when it’s ready. Remove the bay leaf (seriously, don’t forget this step – biting into a bay leaf is not a pleasant surprise).
Step 7: Bring It All Together
Return your steaks to the pan, spooning the sauce over them. Let them warm through for 2-3 minutes. At this point, your kitchen should smell absolutely incredible, and you should be feeling pretty proud of yourself!
Nutritional Information
As a food blogger who believes in balanced eating, I always like to share the nutritional breakdown of my recipes. Here’s what you’re getting per serving:
- Calories: 285
- Protein: 32g (excellent for muscle maintenance and satiety)
- Fat: 14g (mostly from healthy cooking oils and a touch of butter)
- Carbohydrates: 4g (minimal, making this naturally low-carb friendly)
- Fiber: 1g
- Sodium: 890mg (you can reduce this by using low-sodium broth and less salt)
- Iron: 3.2mg (about 18% of your daily need – round steak is an iron powerhouse!)
What I love about this dish nutritionally is that it’s naturally high in protein and relatively low in calories, making it perfect for anyone watching their macros. The lean nature of round steak means you’re getting maximum nutrition without excess saturated fat.
Healthier Alternatives for Every Dietary Need
Over the years, I’ve adapted this recipe for various family members and friends with different dietary needs. Here are my tried-and-tested modifications:
For Low-Sodium Diets: Use no-salt-added beef broth and reduce the salt in the initial seasoning. The Worcestershire sauce still gives incredible flavor depth. My dad has been on a low-sodium diet since his heart surgery, and he loves this version.
For Gluten-Free Friends: Simply replace the all-purpose flour with rice flour or cornstarch. I discovered this when my friend Lisa, who has celiac disease, came for dinner. The crust turns out just as golden and delicious.
For Dairy-Free Needs: Skip the butter and use an extra tablespoon of avocado oil instead. When my neighbor Sarah discovered her lactose intolerance, I developed this version, and honestly, you can barely tell the difference.
For Heart-Healthy Cooking: Use grass-fed beef when possible, and increase the vegetables in the pan sauce. I sometimes add sliced mushrooms and bell peppers for extra nutrients and fiber.
For Keto Followers: This recipe is naturally keto-friendly! Just skip the flour dusting if you want to reduce carbs even further. The sauce will still be delicious, just slightly thinner.
Serving Suggestions That’ll Make Your Family Cheer
This pan seared round steak has become the centerpiece of so many memorable family meals. Here are my favorite ways to serve it:
Sunday Family Dinners: I serve this with creamy mashed potatoes and roasted green beans. There’s something so comforting about this combination that takes me right back to childhood dinners at my grandmother’s table.
Weeknight Comfort: Over egg noodles with the pan sauce spooned generously on top. My kids call this “Mom’s special pasta,” and it’s become our go-to comfort meal when someone’s had a tough day at school.
Holiday Entertaining: Slice the steak thin and serve over garlic mashed cauliflower with roasted Brussels sprouts. This was the star of my husband’s 40th birthday dinner, and our guests couldn’t believe how tender and flavorful it was.
Summer Patio Dinners: Serve at room temperature, sliced thin over a mixed green salad with cherry tomatoes and cucumber. The leftover pan sauce makes an incredible salad dressing when whisked with a little olive oil.
Comfort Food Cravings: Over buttered rice with steamed broccoli on the side. This combination reminds me of the simple, satisfying meals my mom used to make when money was tight but love was abundant.
Instead of wine pairings (since I prefer to keep my recipes alcohol-free), I love serving this with sparkling grape juice in wine glasses for special occasions, or simply ice-cold sweet tea for those casual family dinners.
Common Mistakes to Avoid (Learn from My Kitchen Disasters!)
Let me save you from the mistakes I’ve made over the years. Trust me, I’ve made every single one of these errors, and they’ve all taught me valuable lessons:
Mistake #1: Skipping the Salt-and-Rest Step The first time I made this recipe, I was in a hurry and went straight from seasoning to searing. The result? Tough, chewy steak that no amount of sauce could save. The salt needs time to work its tenderizing magic.
Mistake #2: Using Too High Heat I used to think higher heat meant better searing. Wrong! I burned the outside while leaving the inside tough. Medium-high heat is your sweet spot.
Mistake #3: Moving the Meat Too Soon I was impatient and wanted to check on the searing progress. Every time I moved the steak, I prevented that beautiful crust from forming. Let it be!
Mistake #4: Overcooking the Garlic Burned garlic is bitter garlic. I learned this the hard way when I got distracted by my daughter’s homework question while cooking. Now I add the garlic last and watch it like a hawk.
Mistake #5: Forgetting to Remove the Bay Leaf This might seem minor, but biting into a bay leaf during dinner is definitely not pleasant. I now make it a habit to count my bay leaves going in and coming out!
Mistake #6: Not Letting the Meat Rest I used to serve this immediately after cooking, and all the juices would run out onto the plate. Letting it rest for just 5 minutes makes all the difference in keeping those delicious juices where they belong – in the meat!
Storing Tips for Meal Prep Success
As someone who meal preps religiously (Sunday afternoons are sacred in my house!), I’ve perfected the art of storing this dish for maximum flavor retention:
Refrigerator Storage: Store the cooked steak and sauce separately in airtight containers for up to 4 days. This prevents the meat from getting soggy in the sauce. When I make this on Sunday, we’re still enjoying delicious leftovers by Wednesday.
Freezing Instructions: The cooked steak can be frozen for up to 3 months. I slice it thin before freezing and store it in freezer bags with the date clearly marked. The sauce doesn’t freeze as well due to the dairy, so I recommend making fresh sauce when reheating frozen steak.
Reheating Tips: For best results, reheat gently in a covered skillet over low heat with a splash of beef broth. Microwaving works in a pinch, but use 50% power and cover the dish to prevent drying out.
Make-Ahead Strategy: You can season and flour the steaks up to 24 hours ahead. I often do this step on Sunday afternoon for Tuesday night dinner. Just store them covered in the refrigerator until you’re ready to cook.
Leftover Magic: Thin slices of leftover steak make incredible sandwiches, quesadillas, or additions to scrambled eggs for breakfast. Nothing goes to waste in my kitchen!
FAQ
Over the years, I’ve received so many questions about this recipe from readers and friends. Here are the most common ones:
Q: “Bella, can I use a different cut of beef?”
Absolutely! Eye of round works beautifully, and even bottom round can be delicious with this method. My butcher friend Mike says any round cut will work – just adjust your cooking time slightly for thickness differences.
Q: “What if I don’t have a cast iron skillet?”
Any heavy-bottomed skillet will work! I’ve made this successfully in stainless steel and even a well-seasoned carbon steel pan. The key is even heat distribution, which most quality pans provide.
Q: “Can I make this recipe in advance for entertaining?”
Yes! I often make this for dinner parties. Cook everything through, then keep it warm in a low oven (200°F) for up to an hour. The flavors actually improve with a little extra time to meld together.
Q: “My steak turned out tough – what went wrong?”
This usually comes down to overcooking or not allowing enough salt-resting time. Round steak is naturally lean, so it goes from perfect to overcooked quickly. Invest in a meat thermometer – it’s been a game-changer for me!
Q: “Can I double this recipe for a crowd?”
Definitely! Just use two pans or cook in batches. Don’t overcrowd your pan, or you’ll steam the meat instead of searing it. I learned this lesson the hard way when cooking for my daughter’s graduation party!
Q: “What’s the best way to slice this steak?” Always slice against the grain in thin strips. This breaks up those muscle fibers and ensures every bite is tender. I use a sharp carving knife and slice at a slight diagonal for the prettiest presentation.
Conclusion
Pan seared round steak has become more than just a recipe in my house – it’s become a symbol of how patience, technique, and a little love can transform an affordable cut of meat into something truly special. The key is respecting the meat with proper salting time, achieving that perfect golden crust, and creating a sauce that ties everything together beautifully.
What I love most about this dish is how it proves that you don’t need expensive ingredients to create memorable meals. Some of my family’s most cherished dinner conversations have happened over plates of this humble but delicious steak.
Please leave a comment below and let me know how your pan seared round steak turned out. If you have questions or want to share your own tips, I’m always here to chat about cooking! And don’t forget to subscribe to my blog for more family-tested recipes that prove delicious food doesn’t have to be complicated.
Happy cooking, friends! Here’s to many more delicious meals shared with the people we love most.