
Introduction
There’s something magical about the aroma of a beef roast slowly cooking in the oven—it instantly transports me back to my grandmother’s kitchen in rural Pennsylvania. Last winter, when my family was snowed in for an entire weekend, I decided to perfect my beef bottom round roast recipe.
Have you ever wondered how restaurants achieve that perfect medium-rare center with a deliciously caramelized crust on their roast beef? I certainly did, and that curiosity led me down a rabbit hole of culinary experiments that eventually resulted in the foolproof beef bottom round roast recipe I’m sharing with you today.
This recipe has become our Sunday dinner tradition, with my husband declaring it “better than his mother’s”—which, between you and me, is the highest compliment in our household!
Table of Contents
Ingredients List
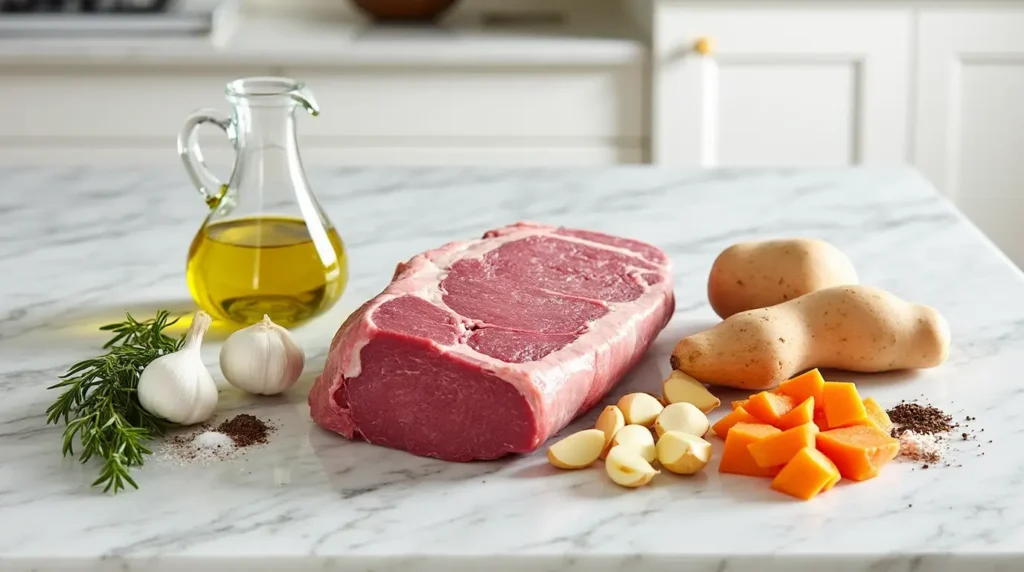
For this beef bottom round roast recipe, you’ll need:
- 3-4 pound beef bottom round roast
- 2 tablespoons olive oil (I use the cold-pressed variety I discovered at our local farmers market last summer)
- 4 cloves garlic, minced (Fresh is best! I grow my own in pots on my kitchen windowsill)
- 1 tablespoon fresh rosemary, chopped (The woody, pine-like fragrance makes all the difference)
- 1 tablespoon fresh thyme, chopped
- 2 teaspoons kosher salt (I love Diamond Crystal brand—it dissolves beautifully)
- 1 teaspoon freshly ground black pepper
- 1 teaspoon paprika (The Hungarian sweet paprika my neighbor brought back from her travels adds a beautiful color and subtle sweetness)
- 1 large onion, roughly chopped
- 2 carrots, roughly chopped
- 2 celery stalks, roughly chopped
- 1 cup beef broth (I make my own and freeze it in batches, but a good-quality store-bought version works well too)
When you unwrap the beef bottom round roast, you’ll immediately notice its deep, rich color and firm texture. This cut comes from the rear leg of the cow, which means it’s leaner and more muscular than other roasts—perfect for slow cooking methods that break down those tough fibers into tender, flavorful meat.
Timing
- Preparation time: 20 minutes (I usually prep the veggies while my oven preheats)
- Resting time: 30 minutes (for the meat to come to room temperature)
- Cooking time: 1 hour 30 minutes to 1 hour 45 minutes (depending on size and desired doneness)
- Resting time after cooking: 15-20 minutes (This is non-negotiable! Trust me on this one)
- Total time: Approximately 2 hours 45 minutes
I typically start this beef bottom round roast recipe around 3:00 PM on Sundays, which means we’re sitting down to dinner by 6:00 PM—perfect timing before my kids need to finish their homework.
Step-by-Step Instructions
Step 1: Prepare the Roast
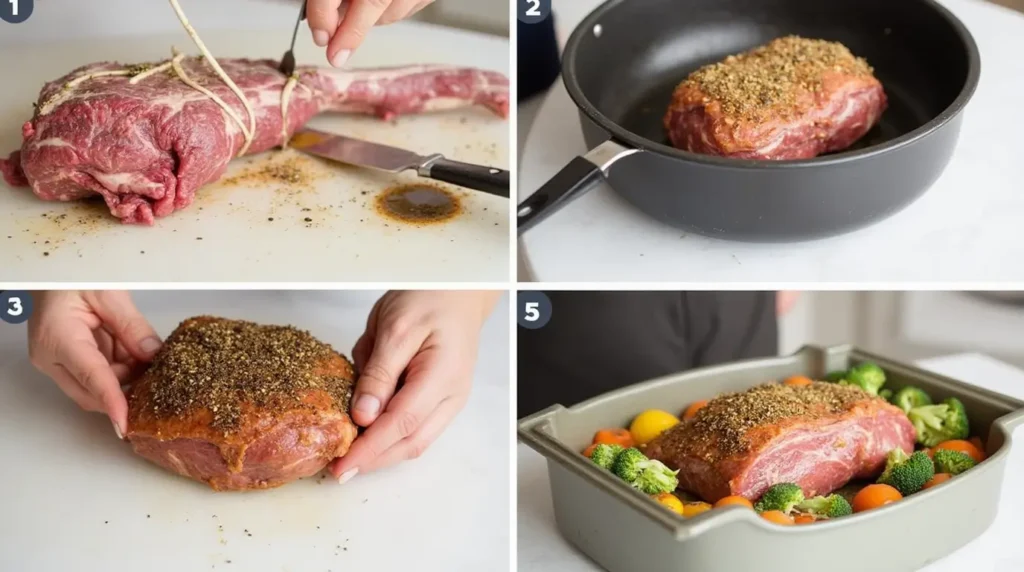
Take your beef bottom round roast out of the refrigerator about 30 minutes before cooking. This step is crucial—the first time I made this recipe, I put the cold roast straight into the oven and wondered why it cooked unevenly! Pat the roast dry with paper towels. Removing excess moisture helps achieve that beautiful brown crust we’re aiming for.
Step 2: Preheat and Season
Preheat your oven to 450°F (232°C). In a small bowl, mix together the olive oil, minced garlic, chopped rosemary, thyme, salt, pepper, and paprika to create a paste. Using your hands (I always keep disposable gloves in my kitchen for messy tasks like this), rub this mixture all over the roast, making sure to cover every surface. There’s something so satisfying about this hands-on approach—it connects you to the food in a way that utensils just can’t match.
Step 3: Prepare the Roasting Pan
Scatter the chopped onions, carrots, and celery in the bottom of a roasting pan. These aromatic vegetables will not only flavor the meat as it cooks but will also contribute to an amazing pan sauce later. Place the seasoned beef bottom round roast on top of the vegetables, fat side up if there is one. The fat will render during cooking, naturally basting the meat and adding flavor.
Step 4: Initial High-Heat Roasting
Here’s a game-changing tip I learned from my butcher: starting with high heat seals in the juices. Place the roasting pan in the preheated oven and cook at 450°F for 15 minutes. Your kitchen will quickly fill with the most mouthwatering aroma as the herbs and spices begin to bloom in the heat.
Step 5: Reduce Heat and Continue Roasting
Reduce the oven temperature to 325°F (163°C) and continue roasting. Pour the beef broth around (not over) the roast. This creates a moist environment without washing away your carefully applied seasoning—a mistake I made once that resulted in a less flavorful crust!
Step 6: Monitor Temperature
For a medium-rare beef bottom round roast (which I find gives the best texture and flavor balance), cook until an instant-read thermometer inserted into the thickest part registers 135°F (57°C). This typically takes about 1 hour 15 minutes to 1 hour 30 minutes for a 3-pound roast. Remember, every oven is different! Mine runs about 25 degrees cool, so I always keep an oven thermometer inside to ensure accuracy.
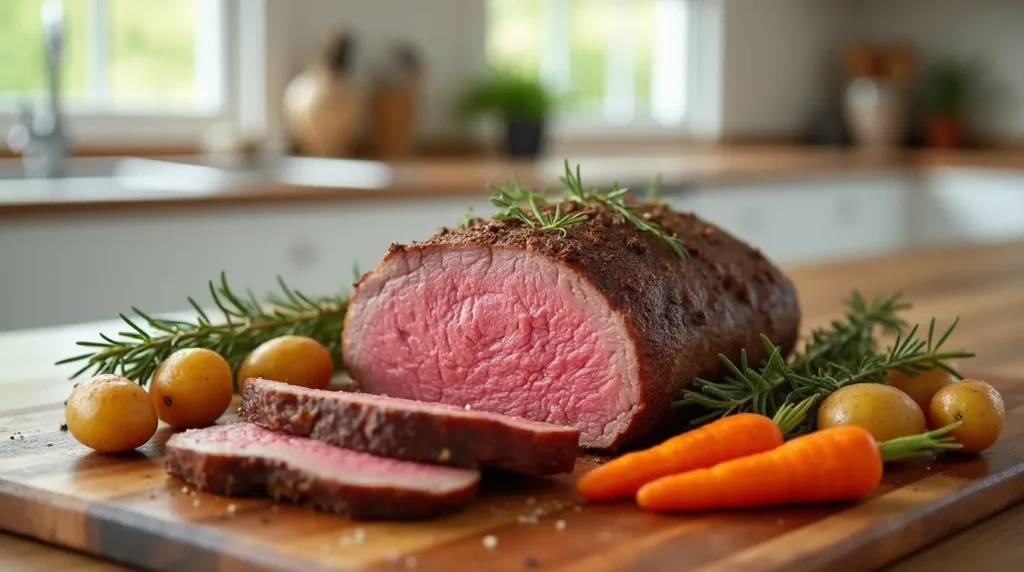
Step 7: Rest the Meat
This might be the hardest part of the entire beef bottom round roast recipe, but it’s absolutely essential! Remove the roast from the oven, transfer it to a cutting board, tent it loosely with aluminum foil, and let it rest for 15-20 minutes. During this time, the internal temperature will continue to rise about 5-10 degrees (reaching an ideal 140-145°F for medium-rare), and the juices will redistribute throughout the meat. The first time I skipped this step (the kids were hungry, what can I say?), the juices ran all over the cutting board instead of staying in the meat where they belong!
Step 8: Make a Simple Au Jus (Optional)
While the roast is resting, strain the liquid from the roasting pan into a small saucepan, pressing on the vegetables to extract all the flavor. Skim off excess fat and simmer the liquid for 5-10 minutes until slightly reduced. Season with salt and pepper if needed. This simple au jus elevates the entire dish and takes advantage of all those wonderful flavors that developed during roasting.
Step 9: Slice and Serve
Using a sharp carving knife (the difference between a properly sharpened knife and a dull one is night and day here), slice the beef bottom round roast thinly against the grain. Cutting against the grain shortens the muscle fibers, making each bite more tender. Serve with the au jus on the side for dipping.
Nutritional Information
I believe in enjoying food mindfully, which includes understanding what we’re putting into our bodies. Here’s the approximate nutritional breakdown per serving (assuming 8 servings from a 3-pound roast):
- Calories: 285
- Protein: 35g
- Fat: 14g (5g saturated)
- Carbohydrates: 3g
- Fiber: 1g
- Sodium: 410mg
As a blogger who cares about balanced nutrition, I always try to pair protein-rich dishes like this beef bottom round roast with plenty of vegetables and a reasonable portion of complex carbs. This approach keeps my family satisfied without feeling weighed down after meals.
Healthier Alternatives for the Recipe
While this beef bottom round roast recipe is relatively healthy as is (especially compared to fattier cuts), there are several modifications you can make to align with specific dietary needs:
- For a lower sodium version, cut the salt in half and use low-sodium beef broth. When my dad was put on a heart-healthy diet last year, I adapted this recipe, and he couldn’t even tell the difference!
- To reduce fat further, trim any visible fat from the roast before cooking. You’ll lose a tiny bit of flavor, but the herbs and spices more than make up for it.
- For a paleo or Whole30 approach, ensure your beef broth is compliant (no added sugars or preservatives). My sister-in-law follows a strict paleo diet, and this is one of the few recipes from my blog that she can enjoy without modifications.
- If you’re watching carbs, simply pair this roast with non-starchy vegetables instead of the traditional potatoes. My personal favorite low-carb side is roasted cauliflower with the same herb blend used on the meat—it creates a harmonious flavor profile throughout the meal.
Serving Suggestions
This versatile beef bottom round roast recipe can be the star of so many different meals:
- Sunday Dinner Classic: Serve thick slices alongside roasted garlic mashed potatoes and steamed green beans with slivered almonds. This combination was the centerpiece of my daughter’s graduation celebration last spring.
- Open-Faced Sandwiches: The next day, thinly slice any leftover roast and pile it on toasted artisan bread with horseradish cream, arugula, and quick-pickled red onions. My husband takes these in his lunch box and reports envious looks from coworkers!
- Hearty Salad: Top a bed of mixed greens with sliced roast beef, blue cheese crumbles, cherry tomatoes, and a balsamic vinaigrette. This was my go-to lunch throughout last summer when I was trying to incorporate more vegetables into my diet.
- Breakfast Hash: Dice leftover beef and crisp it up in a skillet with diced potatoes, bell peppers, and onions, then top with a fried egg. This protein-packed breakfast gets my teenagers through their morning sports practices with energy to spare.
- Asian-Inspired Rice Bowls: Slice the beef very thinly and serve over steamed rice with quick-pickled vegetables, cilantro, and a drizzle of sriracha mayo. My kids discovered this combination during our “around the world” themed dinner week, and it’s now requested regularly!
Common Mistakes to Avoid
Through my many tests of this beef bottom round roast recipe, I’ve made practically every mistake possible so you don’t have to:
- Skipping the room temperature rest before cooking: This leads to uneven cooking—a well-done exterior with an undercooked center. I learned this lesson the hard way when serving company; now I set a timer to remind me to take the meat out early.
- Overcooking: Bottom round is leaner than other roasts, making it less forgiving when overcooked. Use that meat thermometer religiously! The Christmas I tried to multitask without checking the temperature, we ended up with what my husband lovingly refers to as “the great beef jerky disaster of 2022.”
- Not slicing against the grain: The first time I made this roast, I was so proud of how it looked coming out of the oven but disappointed by how chewy it was. Then I realized I was slicing with the grain instead of against it—what a difference when I corrected this mistake!
- Opening the oven door frequently: Each peek drops the temperature by 25-50 degrees, extending cooking time and drying out the roast. I installed an oven with a window specifically because I couldn’t resist checking on my cooking projects!
- Under-seasoning: Beef needs generous seasoning to enhance its flavor. The time I tried to reduce sodium without adjusting other flavorings, my family politely ate their dinner in silence—never a good sign in my chatty household!
Storing Tips for the Recipe
Proper storage ensures you’ll enjoy this beef bottom round roast for days after cooking:
- Refrigeration: Cool the roast completely before refrigerating (within 2 hours of cooking). Store sliced meat in an airtight container with a few tablespoons of the au jus to maintain moisture. It will keep well for 3-4 days. On Sundays, I spend two hours meal prepping for the week, and this recipe maintains its amazing flavor for 3 days in the fridge.
- Freezing: For longer storage, wrap individual portions tightly in freezer paper, then aluminum foil, label with the date, and freeze for up to 3 months. This method has saved me countless times when unexpected company arrives—I simply thaw a portion in the refrigerator overnight and reheat gently.
- Reheating: To prevent drying out, reheat slices gently in a covered skillet with a few tablespoons of beef broth, or in a microwave at 50% power with a damp paper towel over the meat. The microwave method is my daughter’s go-to for after-school snacks.
- Repurposing: Keep the trimmings and less perfect slices separate to use in soups, stews, or sandwiches. I keep a “bits and pieces” container in my freezer specifically for future soup making—nothing goes to waste in my kitchen!
FAQs
Can I use a different cut of beef for this recipe?
Sara from Boston recently asked me this question! While you can apply similar techniques to other cuts, cooking times and temperatures would need adjustment. Bottom round is economical while still having good flavor—but top round, eye of round, or sirloin tip would work with modified cooking times. Chuck roast is more marbled and better suited for pot roast-style recipes.
My roast turned out tough. What went wrong?
This is the most common question I receive! Usually, the culprit is either overcooking or slicing with the grain instead of against it. Remember that meat continues cooking after removing it from the oven, and always use a thermometer rather than relying solely on time. As for slicing, look for the direction of the muscle fibers and cut perpendicular to them.
Can I cook this in a slow cooker or Instant Pot instead?
Absolutely! Josh from Seattle asked about this last month. For slow cooker, sear the seasoned roast in a hot skillet first, then cook on low for 6-8 hours with the same vegetables and broth. For Instant Pot, sear using the sauté function, then pressure cook for about 20 minutes per pound with a natural release. The texture will be different—more like a pot roast than sliced roast beef—but still delicious!
What can I do if I don’t have fresh herbs?
You can substitute dried herbs, but use only one-third the amount (1 teaspoon dried for 1 tablespoon fresh). I keep an herb garden just outside my kitchen door during summer months and freeze portions in olive oil using ice cube trays for winter use—a trick my mom taught me that ensures I always have “fresh” herbs available.
How do I know if my roast is done without a meat thermometer?
While I strongly recommend investing in a good meat thermometer (it’s changed my cooking game completely!), you can use the touch method in a pinch. Medium-rare feels like the fleshy part of your thumb when you touch your thumb and index finger together—slightly firm but with some give. However, this method takes practice and isn’t as reliable, especially for larger cuts.
Conclusion
Mastering this beef bottom round roast recipe has truly been a journey—from those first few overcooked attempts to now being able to produce a perfectly juicy, flavorful roast that my family requests regularly. The keys to success lie in proper seasoning, temperature control, and perhaps most importantly, patience during both the cooking and resting processes.
If you enjoyed this beef bottom round roast recipe, consider subscribing to my weekly newsletter where I share seasonal recipes, kitchen tips, and stories from my culinary adventures. Until next time, happy cooking, friends!