
Introduction
You know that feeling when you need something satisfying, quick, and actually nutritious for your family? That’s exactly where this ground beef and ramen recipe comes in. I’ve perfected this dish over the past three years, and trust me, I tried it at least seven times before getting the balance just right. The combination of savory ground beef, perfectly cooked ramen noodles, and a medley of vegetables creates a one-pot wonder that’ll have your family asking for seconds.
Here’s my secret – this isn’t just about throwing ingredients together. It’s about creating layers of flavor that transform humble ramen into something restaurant-worthy. Are you ready to discover how a few simple ingredients can create pure comfort food magic in under thirty minutes?
Table of Contents
Ingredients List
For the Ground Beef and Ramen Base:
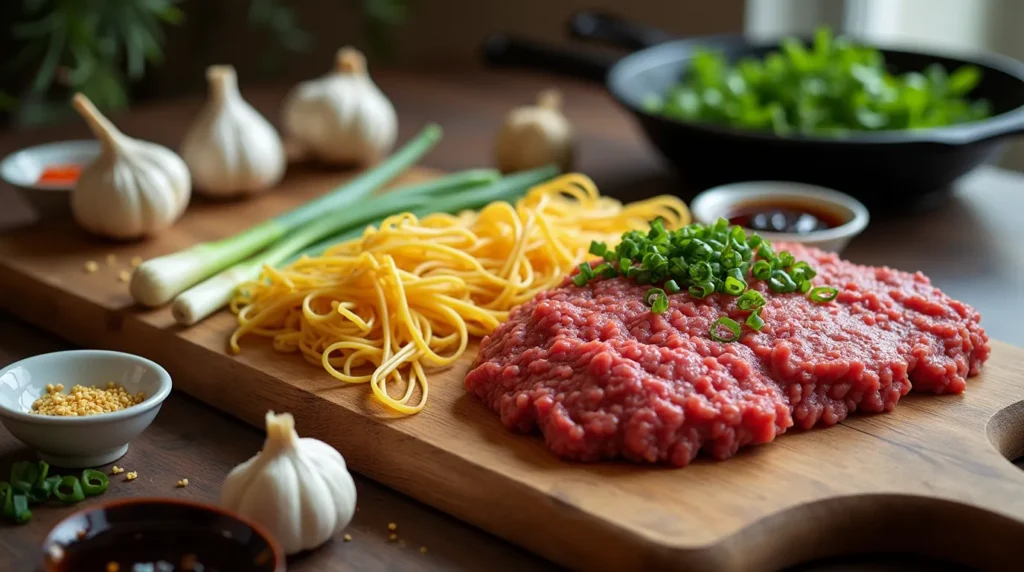
- 1 pound ground beef (85/15 lean-to-fat ratio works perfectly – I get mine from Miller’s Market downtown)
- 4 packages instant ramen noodles (discard seasoning packets – trust me on this one)
- 2 tablespoons vegetable oil (I use the sunflower oil I brought back from my Kansas farm visit)
- 1 large yellow onion, diced (the smell when this hits the hot oil is absolutely divine)
- 3 cloves garlic, minced (I always keep fresh garlic on hand – the pre-minced just doesn’t give that same aromatic punch)
- 1 red bell pepper, sliced (I find the sweetest ones at the farmers market on Saturday mornings)
- 2 cups beef broth (homemade if you have it, but store-bought works beautifully)
- 2 tablespoons soy sauce (I prefer low-sodium to control the salt level)
- 1 tablespoon Worcestershire sauce
- 1 teaspoon garlic powder
- 1/2 teaspoon black pepper, freshly ground
- 1/4 teaspoon red pepper flakes (optional, but my family loves the little kick)
For the Vegetable Medley:
- 1 cup frozen corn kernels (I always keep a bag in my freezer for emergencies like this)
- 1 cup frozen peas (these add such a beautiful pop of color and sweetness)
- 2 green onions, chopped (save some for garnish – the fresh bite is essential)
- 1 tablespoon sesame oil (this adds an incredible nutty aroma that makes the whole dish sing)
Substitution Notes: If you can’t find ground beef, ground turkey works wonderfully – just add an extra tablespoon of oil since it’s leaner. No beef broth? Chicken broth is perfectly fine. For my vegetarian friends, I’ve made this with plant-based ground “meat” and vegetable broth with amazing results.
Timing
Prep Time: 10 minutes Cook Time: 18 minutes
Total Time: 28 minutes Serves: 4-6 people
Here’s the beauty of this recipe – it’s genuinely quick without sacrificing flavor. I usually start this when I get home from work at 5:30, and we’re sitting down to eat by 6:00. The key is having all your vegetables chopped and ready before you start cooking. I learned this lesson the hard way when I once had perfectly browned beef sitting in the pan while I frantically diced onions!
This recipe is absolutely perfect for those hectic weeknight dinners when everyone’s coming home at different times. The whole family can easily reheat portions as needed, and it actually tastes even better the next day. I often make a double batch on Sunday afternoons to have ready for those crazy weeknight moments.
Step 1: Prepare Your Ingredients
Before you even think about turning on the stove, get everything prepped and ready. Dice that onion, mince your garlic (the smell on your hands will remind you why fresh is always better), and slice your bell pepper into thin strips. Trust me, once you start cooking, things move quickly, and you don’t want to be scrambling with a knife while your beef is browning.
I always arrange my prepped ingredients in small bowls on my counter – it makes me feel like I’m on a cooking show, and more importantly, it ensures nothing gets forgotten or overcooked while I’m searching for the next ingredient.
Step 2: Brown the Ground Beef
Heat that vegetable oil in a large skillet or wok over medium-high heat. When it’s shimmering (but not smoking – learned that lesson the hard way!), add your ground beef. Here’s where patience pays off – let it sit undisturbed for about 3-4 minutes to develop that beautiful brown crust.
The first time I made this recipe, I kept stirring the beef constantly, and it ended up gray and unappetizing. Now I know to let it do its thing! Break it up into bite-sized pieces with your spoon, but don’t go crazy with the stirring. You want those lovely browned edges that add so much flavor to the final dish.
Step 3: Add the Aromatics
Once your beef is nicely browned (about 6-7 minutes total), push it to one side of your pan and add the diced onion to the empty space. This little trick prevents the onions from steaming in the beef juices – they’ll caramelize beautifully instead. After about 3 minutes, when the onions start turning translucent and smell absolutely heavenly, add that minced garlic.
Here’s my golden rule with garlic – never let it brown! It only needs about 30 seconds in the pan before it releases that gorgeous aroma. The moment you smell it, you’re ready for the next step.
Step 4: Incorporate the Bell Pepper
Add those beautiful red bell pepper strips to the pan and stir everything together. The colors at this stage are just gorgeous – the deep brown of the beef, the golden onions, and those vibrant red peppers. Cook for another 2-3 minutes until the peppers start to soften but still have a little bite to them.
This is where I always take a moment to appreciate what’s happening in my kitchen. The sizzling sounds, the incredible smells – it’s these little moments that remind me why I love cooking so much.
Step 5: Create the Flavorful Base
Pour in your beef broth, soy sauce, and Worcestershire sauce. Add the garlic powder, black pepper, and red pepper flakes if you’re using them. Give everything a good stir and bring it to a gentle boil. The kitchen should smell absolutely amazing at this point – rich, savory, and completely irresistible.
I always taste the broth at this stage and adjust the seasoning if needed. Remember, you can always add more, but you can’t take it away!
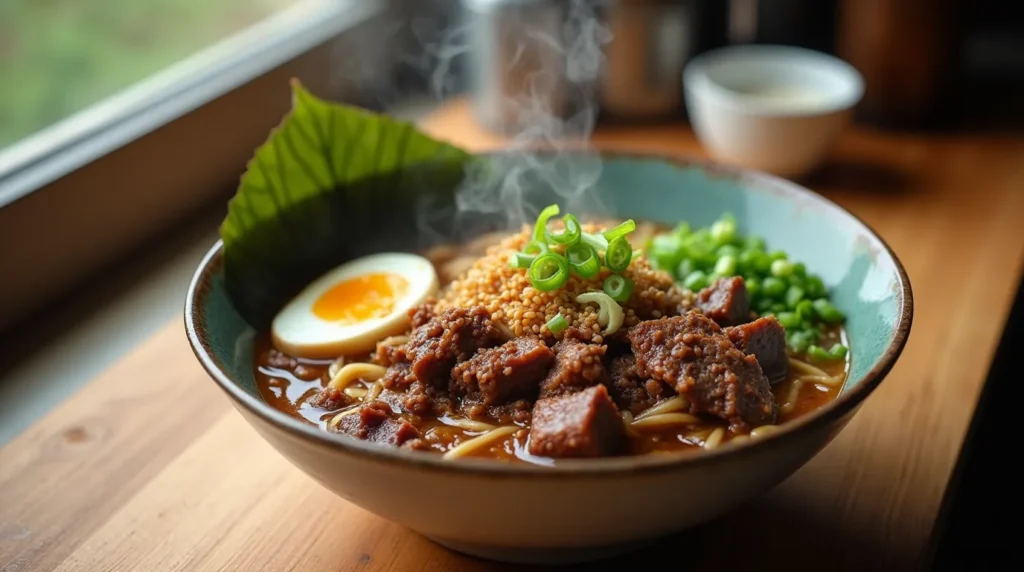
Step 6: Add the Ramen Noodles
Here’s where the magic happens! Add those ramen noodles directly to the simmering mixture. Break them up slightly with your spoon, but don’t worry about making them perfect – they’ll soften and separate as they cook. This takes about 3-4 minutes, and you’ll want to stir occasionally to make sure all the noodles get evenly cooked.
The noodles will absorb so much of that delicious flavor you’ve built up. This is why we don’t use the seasoning packets – we’re creating something so much better!
Step 7: Final Touches
In the last minute of cooking, stir in your frozen corn and peas. They’ll warm through quickly and add such beautiful color and texture to the dish. Drizzle that sesame oil over everything and give it one final stir. The sesame oil is what takes this from good to absolutely incredible – don’t skip it!
Remove from heat and sprinkle with those chopped green onions. The fresh bite of the scallions is the perfect finish to this rich, comforting dish.
Nutritional Information
This hearty ground beef and ramen recipe provides a well-balanced meal that I feel good about serving my family. As a food blogger who’s always conscious about nutrition, I love that this dish delivers protein, vegetables, and carbohydrates in every satisfying bite.
Per Serving (based on 4 servings):
- Calories: 485
- Protein: 28g
- Carbohydrates: 42g
- Fat: 22g
- Fiber: 4g
- Sodium: 890mg
- Iron: 15% Daily Value
- Vitamin C: 45% Daily Value
The ground beef provides excellent protein and iron, while the mixed vegetables contribute essential vitamins and fiber. The ramen noodles give us the comforting carbohydrates that make this dish so satisfying after a long day. I appreciate that each serving delivers nearly 30 grams of protein – perfect for keeping my active family fueled.
Healthier Alternatives for the Recipe
When my sister started watching her sodium intake, I developed several modifications that maintain all the flavor while making this dish even more nutritious. These alternatives have become so popular that sometimes we prefer them to the original!
For Lower Sodium: Use low-sodium soy sauce and broth, and substitute half the ramen noodles with shirataki noodles or zucchini spirals. I discovered this combination when trying to reduce our family’s sodium intake, and honestly, you can barely tell the difference.
For Higher Protein: I sometimes use 93% lean ground beef and add a beaten egg during the last minute of cooking, stirring it in quickly to create silky ribbons throughout the dish. My teenage son, who’s always trying to build muscle, absolutely loves this version.
For Extra Vegetables: Double the bell peppers and add broccoli florets, snap peas, or shredded carrots. When my mother-in-law was visiting and mentioned needing more vegetables in her diet, I loaded this dish up with colorful veggies, and she couldn’t stop raving about it.
For Gluten-Free Friends: Replace the ramen noodles with rice noodles or kelp noodles. Make sure to use tamari instead of soy sauce. I created this version when my neighbor’s daughter was diagnosed with celiac disease, and it’s become one of her favorite meals.
Serving Suggestions
This ground beef and ramen recipe is wonderfully versatile and works beautifully for so many occasions. I love serving it in deep bowls with chopsticks – it makes even a Tuesday night dinner feel special and fun. The kids always get a kick out of the chopsticks, and it somehow makes them eat more vegetables!
For casual family dinners, I serve this alongside a simple cucumber salad dressed with rice vinegar and a sprinkle of sesame seeds. The cool, crisp cucumber perfectly balances the warm, rich flavors of the ramen dish. During summer months, I often add sliced avocado on top – the creaminess is absolutely divine with the savory beef.
When I’m entertaining, I set up a “ramen bar” with small bowls of toppings: extra green onions, sesame seeds, sriracha sauce (for the heat lovers), and crispy garlic. Everyone can customize their bowl, and it becomes an interactive dining experience that guests always remember.
This dish was the star of my husband’s last birthday celebration when he requested “comfort food” instead of anything fancy. I served it family-style in a large, beautiful ceramic bowl with crusty bread on the side for those who wanted to soak up every drop of the flavorful broth.
For a complete meal, I sometimes serve steamed edamame as an appetizer and fresh fruit for dessert. The light, clean flavors complement the rich main dish perfectly without being too heavy.
Common Mistakes to Avoid
After making this recipe countless times and teaching it to friends and family, I’ve seen the same mistakes pop up repeatedly. Let me save you from the learning curve I went through!
Overcooking the Ramen Noodles: This was my biggest mistake in the early days. Ramen noodles go from perfect to mushy in about 30 seconds. Start checking them at the 3-minute mark, and remember they’ll continue cooking slightly even after you remove the pan from heat.
Using the Seasoning Packets: I know it’s tempting – they’re right there in the package! But trust me, the flavor we’re building with real ingredients is so much better than those artificial seasonings. The first time I made this cake… wait, wrong mistake story! The first time I made this dish with the seasoning packets, it was way too salty and had that artificial taste that made me cringe.
Not Prepping Ingredients First: I learned this lesson the hard way during a particularly disastrous dinner attempt. While I was frantically chopping vegetables, my beautiful browned beef turned into charcoal. Now I have everything ready before I even heat the oil.
Stirring the Beef Too Much: Let that meat develop a proper crust! Constant stirring leads to gray, steamed beef instead of the gorgeous caramelized pieces that make this dish special.
Adding Vegetables Too Early: Frozen peas and corn only need about a minute to warm through. Add them any earlier, and they’ll turn to mush. I want them bright and slightly crisp for the best texture contrast.
Forgetting the Sesame Oil: This final drizzle is what elevates the entire dish. It’s not just an ingredient – it’s the magical finishing touch that makes everything come together.
Storing Tips for the Recipe
One of the things I love most about this ground beef and ramen recipe is how well it keeps and reheats. As someone who meal preps every Sunday for the busy week ahead, this dish has become a staple in my rotation.
Refrigerator Storage: This keeps beautifully in the fridge for up to 4 days in airtight containers. I use glass containers because they don’t absorb odors and reheat evenly. The flavors actually meld and improve after a day – my husband always says it tastes even better as leftovers!
Reheating Instructions: For best results, reheat gently in a skillet over medium-low heat with a splash of broth or water to loosen the noodles. Microwave reheating works too – just add a tablespoon of water and heat in 30-second intervals, stirring between each interval.
Freezer Storage: While I don’t typically freeze this dish (the noodle texture changes), the beef mixture without the noodles freezes beautifully for up to 3 months. I sometimes make a double batch of just the beef and vegetable mixture, freeze half, and then add fresh noodles when I’m ready to serve.
Make-Ahead Tips: You can brown the beef and prep all vegetables up to 2 days ahead. Store them separately in the refrigerator, then combine when you’re ready to finish the dish. This is perfect for those super busy weeknights when even 30 minutes feels like too much.
Meal Prep Magic: I often make individual portions in glass containers for quick lunch options throughout the week. Just add a bit of hot broth when reheating to refresh the flavors.
FAQs
Q: Can I use fresh ramen noodles instead of instant?
Sarah from Portland asked me this just last week! Absolutely! Fresh ramen noodles work beautifully, but reduce the cooking time to about 2-3 minutes since they’re already more tender. They’ll give you an even more restaurant-quality texture.
Q: What if I don’t have beef broth?
This question comes up all the time, and I totally understand – we don’t always have everything on hand. Chicken broth works perfectly, or even vegetable broth if that’s what you have. In a pinch, I’ve used water with an extra splash of soy sauce and Worcestershire, and it still turned out delicious.
Q: Can I make this dish spicier?
My teenage nephew asks me this every time I make it! Absolutely – add more red pepper flakes, a splash of sriracha, or even some diced jalapeños with the bell peppers. I sometimes make half the batch mild for the kids and add hot sauce to my portion at the end.
Q: How can I make this recipe dairy-free? Great question from my neighbor who recently discovered a dairy sensitivity. This recipe is naturally dairy-free as written! Just make sure your broth doesn’t contain any dairy products (most don’t, but it’s worth checking the label).
Q: Can I add other vegetables?
Jennifer from my book club loves to experiment with vegetables, and I encourage it! Broccoli, snap peas, mushrooms, and carrots all work wonderfully. Just adjust the cooking times – harder vegetables like carrots should go in with the bell peppers, while delicate ones like spinach can be stirred in at the very end.
Q: Why do you discard the seasoning packets?
This is probably my most frequently asked question! Those packets are loaded with sodium and artificial flavors. By building our own flavor base with real ingredients, we get so much more depth and can control the salt level. Plus, it tastes infinitely better – I promise!
Conclusion
This easy ground beef and ramen recipe has truly become one of our family’s most requested meals. In under 30 minutes, you can create a satisfying, flavorful dinner that brings everyone to the table with smiles. The combination of perfectly seasoned ground beef, tender ramen noodles, and colorful vegetables creates comfort food that actually nourishes your family.
Have you tried this recipe yet? I’d love to hear your thoughts, variations, and any creative twists you’ve discovered. Leave a comment below sharing your experience, or drop me a review to let other readers know how it turned out for your family. Don’t forget to subscribe to my blog for more comforting, family-friendly recipes that make weeknight dinners something to look forward to. Happy cooking, friends!