
My Love Affair with Perfect Chicken Cutlets
You know that feeling when you bite into perfectly crispy chicken cutlets and hear that satisfying crunch? The kind where the coating stays put instead of sliding off like a sad, soggy mess? Let me tell you a secret – I tried perfecting this recipe seven times before getting it absolutely right. Each attempt taught me something new, and now I’m sharing every single trick with you.
These chicken cutlets have become my family’s ultimate comfort food. Whether it’s a busy Tuesday night or a lazy Sunday when we’re all craving something indulgent, this recipe delivers golden perfection every single time. The best part? From start to finish, you’re looking at just 15 minutes of active cooking time.
Ingredients List
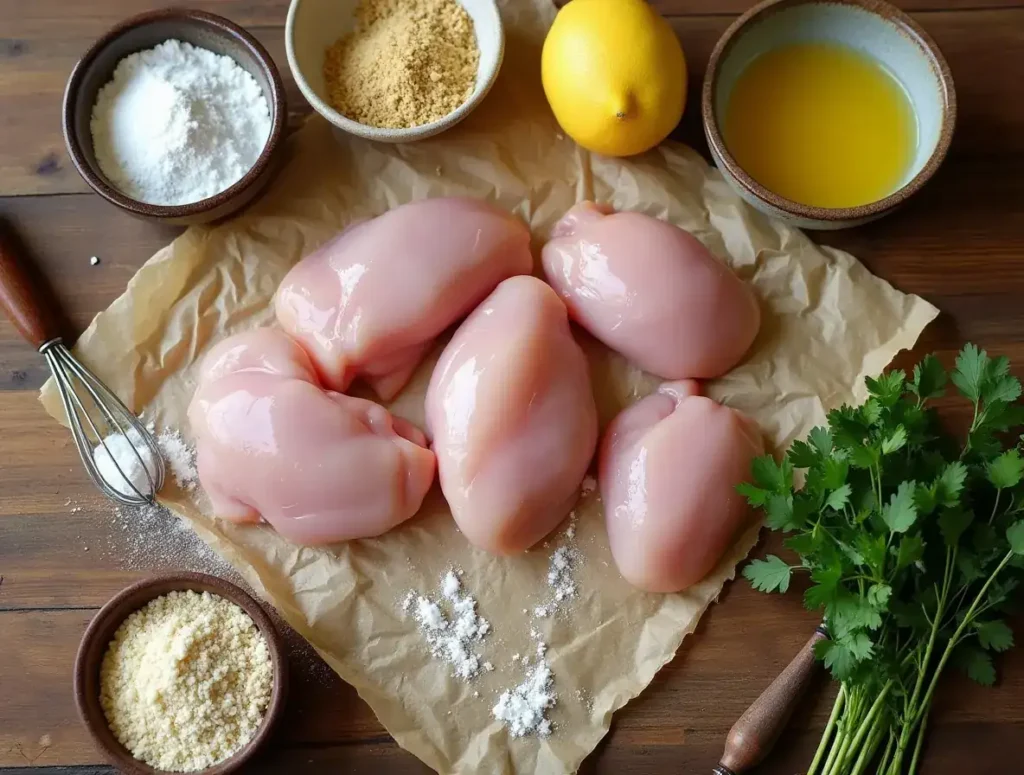
Here’s everything you’ll need for these crispy beauties. Trust me, each ingredient plays a crucial role in creating that perfect texture we’re after:
For the Chicken:
- 4 boneless, skinless chicken breasts (about 1.5-2 pounds)
- 1 teaspoon salt (I use the coarse sea salt I brought back from my trip to Cape Cod last summer)
- 1/2 teaspoon black pepper, freshly ground
- 1/2 teaspoon garlic powder
- 1/4 teaspoon paprika (gives that gorgeous golden color)
For the Breading Station:
- 1 cup all-purpose flour
- 3 large eggs, beaten (room temperature works best)
- 2 cups panko breadcrumbs (this is non-negotiable – regular breadcrumbs just won’t give you that crunch)
- 1/2 cup grated Parmesan cheese (freshly grated, please!)
- 1 teaspoon Italian seasoning
- 1/2 teaspoon onion powder
For Cooking:
- 1/2 cup vegetable oil (or enough for about 1/4 inch depth in your pan)
Substitution Notes: If you can’t find panko breadcrumbs, you can make your own by pulsing day-old bread in a food processor – though I promise the store-bought panko is worth seeking out. For a gluten-free version, I’ve successfully used almond flour in place of regular flour and crushed cornflakes instead of panko (my neighbor introduced me to this trick, and it’s surprisingly delicious).
Timing
This is where this recipe really shines – it’s incredibly efficient for busy weeknights:
- Prep Time: 10 minutes
- Cooking Time: 6-8 minutes per batch
- Total Time: 20-25 minutes (depending on batch size)
Here’s my timing strategy: I usually set up my breading station while the oil is heating. If I’m feeling particularly organized (which happens about once a month), I’ll pound the chicken and set up my breading station during my Sunday meal prep. The seasoned chicken can sit in the fridge for up to 24 hours, actually improving in flavor.
This recipe is perfect for those chaotic evenings when my kids have back-to-back activities. I can have dinner on the table faster than most takeout deliveries, and it’s infinitely more satisfying.
Step 1: Prepare the Chicken
Start by placing your chicken breasts between two pieces of plastic wrap or parchment paper. Using a meat mallet or rolling pin, gently pound them to an even 1/4-inch thickness. Don’t go crazy here – I learned this the hard way when I practically turned my first batch into chicken pancakes!
Season both sides generously with salt, pepper, garlic powder, and paprika. Let them sit for about 5 minutes while you set up your breading station. This brief rest allows the seasonings to penetrate the meat.
Step 2: Set Up Your Breading Station
This is where organization pays off. Set up three shallow dishes in a row: flour in the first, beaten eggs in the second, and your panko mixture in the third.
For the panko mixture, combine the breadcrumbs, Parmesan cheese, Italian seasoning, and onion powder. I like to use my hands to mix this – it helps break up any clumps and ensures even distribution. The cheese adds an incredible nutty flavor that makes these cutlets absolutely irresistible.
Step 3: The Breading Process
Here’s where the magic happens, and trust me, technique matters. Working with one cutlet at a time, dredge it in flour, shaking off excess. Next, dip it in the beaten eggs, letting any excess drip off. Finally, press it firmly into the panko mixture, making sure both sides are completely coated.
The key here is to really press that breading into the chicken. Don’t just sprinkle it on – use your hands to gently but firmly press those crumbs into the meat. This is what creates that incredible crust that stays put during cooking.
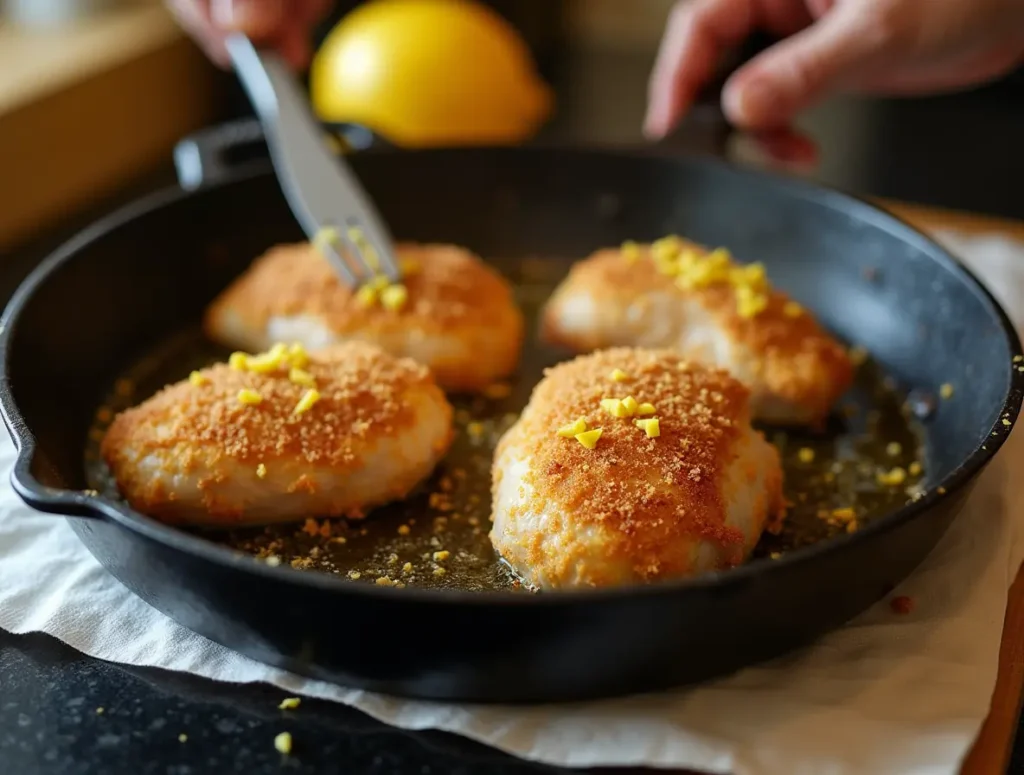
Step 4: Heat the Oil
In a large skillet (I prefer my 12-inch cast-iron pan for this), heat the oil over medium-high heat. The oil is ready when a small piece of breading sizzles immediately upon contact. If you have a thermometer, you’re looking for about 350°F.
This is crucial – if the oil isn’t hot enough, your cutlets will absorb oil and become greasy. Too hot, and the outside burns before the inside cooks through. I learned this lesson the hard way during my early attempts.
Step 5: Cook the Cutlets
Carefully place the breaded cutlets in the hot oil, being careful not to overcrowd the pan. Cook for 3-4 minutes on the first side without moving them. You’ll know they’re ready to flip when the edges start looking golden and crispy.
Flip carefully using a thin spatula, and cook for another 2-3 minutes on the second side. The internal temperature should reach 165°F, and the coating should be golden brown and crispy.
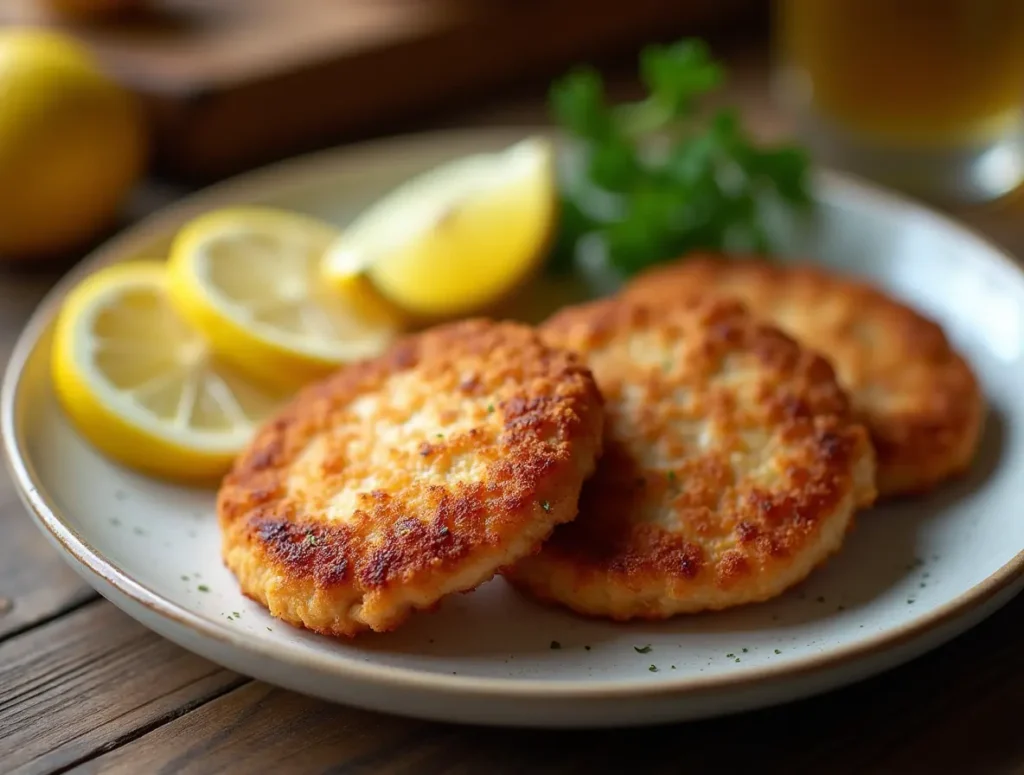
Step 6: Drain and Serve
Transfer the cooked cutlets to a paper towel-lined plate for just a moment to drain excess oil, then move them to a wire rack if you have one. This prevents the bottom from getting soggy – a trick I learned from my grandmother who always said “never let good crispy food sit on paper towels too long.”
Nutritional Information
As someone who’s always conscious about balanced nutrition for my family, I love that these chicken cutlets pack a serious protein punch while still satisfying our comfort food cravings:
Per serving (1 cutlet):
- Calories: 320
- Protein: 35g
- Carbohydrates: 18g
- Fat: 12g
- Fiber: 1g
- Sodium: 580mg
The high protein content makes this perfect for active families, and the moderate calorie count means you can pair it with plenty of vegetables without guilt. I always feel good serving this to my kids because I know they’re getting quality nutrition wrapped up in something they absolutely love.
Healthier Alternatives for the Recipe
Over the years, I’ve developed several modifications to make this recipe work for different dietary needs in our family and friend circle:
For Lower Fat: You can bake these at 425°F for 15-20 minutes, flipping once. I spray them lightly with cooking spray before baking. While they won’t be quite as crispy as the pan-fried version, they’re still delicious and significantly lower in fat.
For Gluten-Free: Replace the flour with almond flour and use crushed corn flakes or gluten-free panko. When my friend Sarah discovered her gluten sensitivity, we perfected this version together, and honestly, her family might prefer it to the original.
For Lower Sodium: Use unsalted Parmesan and reduce the salt in the seasoning. I compensate by adding extra herbs like oregano and thyme.
For Dairy-Free: Simply omit the Parmesan cheese and add an extra tablespoon of Italian seasoning to the panko mixture. Still incredibly flavorful!
The beauty of this recipe is its adaptability. I’ve made it work for almost every dietary restriction that’s come through my kitchen.
Serving Suggestions
These versatile chicken cutlets work beautifully in so many different ways. Here are some of my family’s favorite serving methods:
Classic Comfort: Serve alongside creamy mashed potatoes and steamed green beans. This was the combination that won over my initially skeptical mother-in-law during her first visit.
Italian Style: Top with marinara sauce and mozzarella cheese, then broil for 2 minutes until bubbly. Serve over pasta for an easy chicken parmigiana that rivals any restaurant version.
Fresh and Light: Slice and serve over a bed of mixed greens with cherry tomatoes, cucumber, and a lemon vinaigrette. Perfect for summer evenings when it’s too hot for heavy sides.
Sandwich Style: These make incredible sandwiches! I love them on toasted brioche buns with lettuce, tomato, and a dollop of garlic aioli.
Southern Comfort: Serve with mac and cheese and coleslaw for a meal that screams “Sunday dinner at grandma’s house.”
For beverages, I typically serve iced tea, lemonade, or sparkling water with lemon. The crispy, savory chicken pairs beautifully with something bright and refreshing.
Common Mistakes to Avoid
Let me save you from the errors I made while perfecting this recipe:
Mistake #1: Not Pounding the Chicken Evenly I can’t tell you how many times I’ve ended up with overcooked edges and undercooked centers because I rushed this step. Take your time to get uniform thickness – it makes all the difference.
Mistake #2: Skipping the Resting Time In my early days, I’d bread the chicken and immediately throw it in the pan. Big mistake! Let the breaded cutlets rest for 5 minutes before cooking. This helps the coating adhere better.
Mistake #3: Overcrowding the Pan I learned this lesson the hard way when I tried to cook all four cutlets at once in my excitement. They steamed instead of crisped, and the oil temperature dropped dramatically. Cook in batches – it’s worth the extra few minutes.
Mistake #4: Moving Them Too Soon Patience, my friends! Let that first side develop a proper crust before flipping. If you try to move them too early, you’ll lose half your beautiful coating in the pan.
Mistake #5: Wrong Oil Temperature Too cool, and they absorb grease. Too hot, and they burn. If you don’t have a thermometer, test with a small piece of breading – it should sizzle immediately but not violently.
Storing Tips for the Recipe
These chicken cutlets are fantastic for meal prep, and I often make extra for the week ahead:
Refrigerator Storage: Cooked cutlets will keep in the refrigerator for up to 4 days. I store them in an airtight container with parchment paper between layers to prevent sticking.
Freezer Storage: You can freeze cooked cutlets for up to 3 months. I wrap each one individually in plastic wrap, then store in a freezer bag. This way, I can grab just what I need.
Reheating Tips: To maintain crispiness, reheat in a 375°F oven for 8-10 minutes rather than using the microwave. If you’re in a hurry, a toaster oven works wonderfully too.
Make-Ahead Strategy: Every other Sunday, I bread a double batch and freeze half uncooked. They cook straight from frozen – just add an extra 2-3 minutes to the cooking time. This has been a game-changer on those nights when I’ve completely forgotten to plan dinner.
Pro Tip: I always write the date on my freezer bags with a Sharpie. Trust me, frozen breaded chicken from last month looks exactly like frozen breaded chicken from last week!
FAQs
Q: Can I use chicken thighs instead of breasts?
A: Absolutely! My neighbor Maria actually prefers thighs for this recipe. They stay more tender and juicy. You’ll need to cook them a minute or two longer to ensure they reach 165°F internal temperature.
Q: What if I don’t have panko breadcrumbs?
A: Regular breadcrumbs will work, but you won’t get that same incredible crunch. In a pinch, I’ve crushed up cornflakes or even crackers. My kids actually loved the Ritz cracker version I made during a pantry-cleanout dinner!
Q: Can I make these ahead for a party?
A: Yes! I often make them earlier in the day and keep them warm in a 200°F oven on a wire rack. They stay crispy for about an hour this way. For longer storage, let them cool completely, then reheat in the oven when ready to serve.
Q: Why do my cutlets sometimes turn out soggy?
A: Usually, this happens when the oil isn’t hot enough or the cutlets are overcrowded in the pan. Make sure your oil is properly heated and give each cutlet plenty of space to cook properly.
Q: Is there a way to reduce the mess from breading?
A: Use one hand for wet ingredients and one hand for dry – this prevents the dreaded “club hands” where everything sticks to your fingers. I learned this trick from a cooking show and it’s been a lifesaver!
Conclusion
These crispy chicken cutlets have become the ultimate weeknight hero in my kitchen. With their golden, crunchy exterior and tender, juicy interior, they satisfy even the pickiest eaters while being sophisticated enough for adult palates. The 15-minute cooking time makes them perfect for busy schedules, and the simple ingredients mean you can make them anytime without a special grocery run.
Happy cooking, friends! These chicken cutlets are about to become your new favorite weeknight dinner.