
Introduction
The first time I tasted authentic Beef Pares was during a food festival in Chicago’s Filipino neighborhood three summers ago. I still remember the moment – standing under a striped tent, surrounded by the buzz of excited conversations and delicious cooking aromas. One bite of this tender beef stew paired with garlic rice, and I was completely hooked on this Beef Pares Filipino recipe.
Have you ever tasted something so delicious that you became obsessed with recreating it at home? That’s exactly what happened to me. Let me tell you a secret – I tried this recipe 7 times before getting it perfect! My husband Tom jokes that he gained five pounds during my “Beef Pares experiment month,” but he wasn’t complaining.
Table of Contents
Ingredients List
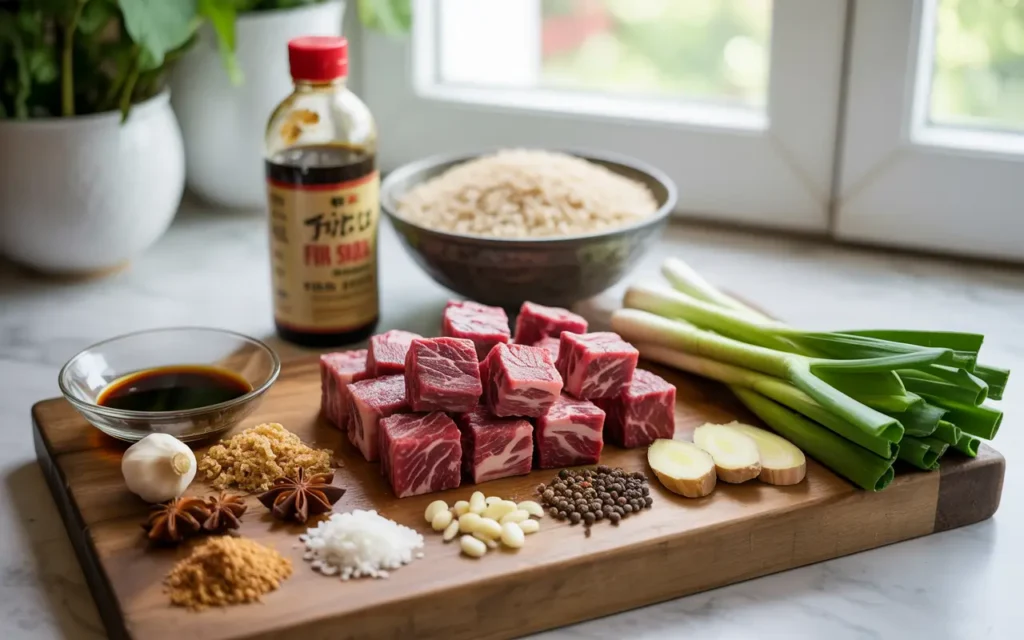
For the Beef:
- 2 pounds beef brisket (cut into 2-inch cubes) – I get mine from Joe at the farmer’s market who raises grass-fed cattle just outside Madison
- 2 tablespoons cooking oil – I prefer avocado oil for its high smoke point
- 1 large onion, diced – Sweet Vidalia onions add a lovely depth of flavor
- 6 cloves garlic, minced – Fresh from my little kitchen garden!
- 2-inch piece ginger, sliced – The fresher your ginger, the more aromatic your dish will be
- 2 star anise pods – These little stars might look unassuming, but trust me, they’re essential for authentic flavor
- 1 cinnamon stick – I keep mine in an airtight container to preserve that intense fragrance
- 4 cups beef broth – I usually make my own bone broth on weekends, but low-sodium store-bought works too
- 1/4 cup soy sauce – I’ve tried many brands and landed on Kikkoman for this recipe
- 3 tablespoons brown sugar – Dark brown sugar adds a deeper molasses flavor I absolutely love
- 1 tablespoon fish sauce – This adds that umami punch that makes all the difference
- Salt and pepper to taste
For the Sauce:
- 1/4 cup reserved beef broth (from cooking)
- 2 tablespoons brown sugar
- 1 tablespoon soy sauce
- 1 teaspoon cornstarch dissolved in 2 tablespoons water – I always mix this in a separate small bowl first to avoid lumps
For the Garlic Rice:
- 3 cups cooked jasmine rice – Preferably day-old rice from the fridge
- 4 tablespoons oil
- 8 cloves garlic, minced – Yes, we use a LOT of garlic in this house!
- Salt to taste
Optional Garnish:
- Chopped green onions – From my herb garden when in season
- Fried garlic bits – I always make extra because my kids steal them for snacking
- Fresh cilantro leaves – If you’re a cilantro lover like me!
Timing
Prep Time: 30 minutes
Cook Time: 2 hours 30 minutes
Total Time: 3 hours
I usually make this Beef Pares Filipino recipe on Sunday afternoons when I have time to let it simmer to perfection. The actual hands-on time is minimal, which means I can help the kids with homework or catch up on laundry while the beef works its magic on the stove. If you’re really short on time, a pressure cooker can reduce the cooking time to about 45 minutes, though I find the traditional stovetop method gives the flavors more time to develop and meld together.
Pro tip: This dish actually tastes even better the next day after all those beautiful flavors have had time to get friendly in the fridge overnight. I often make a double batch on weekends so we can enjoy it for Monday’s dinner when we’re all tired from the start of the workweek!
Step-by-Step Instructions
Step 1: Prepare the Beef
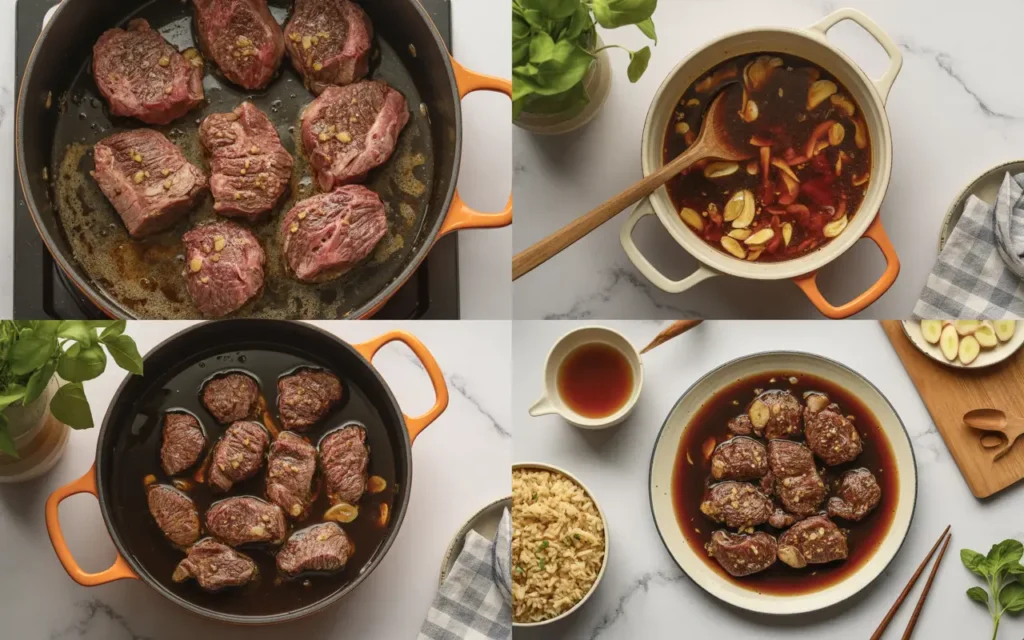
First, let’s get our beef ready. Rinse the beef brisket cubes under cold water and pat them dry with paper towels. Season generously with salt and pepper.
Heat the cooking oil in a large, heavy-bottomed pot over medium-high heat. When it’s nice and hot (you’ll see that shimmer), add the beef cubes in batches. Don’t overcrowd the pot—this was my rookie mistake the first time I made this dish! Overcrowding causes the meat to steam rather than sear, and you’ll miss out on all that beautiful caramelization that adds incredible flavor.
Sear each batch for about 2-3 minutes per side until you get a gorgeous brown crust. As each batch finishes, transfer to a plate and set aside.
Step 2: Saute the Aromatics
In the same pot (don’t you dare wash out all that flavorful goodness!), reduce the heat to medium and add your diced onions. Cook them for about 3-4 minutes until they turn translucent and start to soften.
Add the minced garlic and sliced ginger, cooking for another minute until fragrant. The smell that fills your kitchen at this point is absolutely heavenly—it’s what makes my teenagers suddenly appear in the kitchen asking, “When’s dinner, Mom?”
Step 3: Simmer the Beef
Return the seared beef to the pot, along with any juices that have collected on the plate (that’s pure flavor, folks!). Add the star anise pods and cinnamon stick.
Pour in the beef broth, soy sauce, brown sugar, and fish sauce. Stir everything together and bring the mixture to a boil.
Once boiling, reduce the heat to low, cover the pot, and let it simmer. This is where patience comes in! Let it simmer for about 2 hours, or until the beef is fork-tender. I check mine at the 1.5-hour mark by pressing a piece with a fork—when it easily falls apart, we’re in business!
Step 4: Prepare the Sauce
When the beef is almost tender, it’s time to make that lovely sauce that gives beef pares its signature flavor. Ladle out about 1/4 cup of the cooking broth into a small saucepan.
Add the brown sugar and soy sauce, then bring to a simmer over medium heat. Once the sugar has dissolved, add your cornstarch slurry (the cornstarch mixed with water).
Whisk continuously until the sauce thickens to a beautiful glossy consistency—about 1-2 minutes. Remove from heat and set aside.
The first time I made this sauce, I added the cornstarch directly to the hot liquid and ended up with little lumpy dumplings floating around! Trust me, mixing the cornstarch with cold water first makes all the difference.
Step 5: Make the Garlic Rice
While the beef is in its final cooking stage, let’s prepare the garlic rice. Heat the oil in a large wok or skillet over medium heat.
Add the minced garlic and cook until golden brown and crispy—about 2-3 minutes. Be careful not to burn it! There’s a fine line between perfectly golden garlic and bitter burnt garlic. I hover over the pan like a helicopter mom during this step!
Add the cooked rice to the pan, breaking up any clumps with a wooden spoon. Toss everything together until the rice is evenly coated with the garlic-infused oil. Season with salt to taste and continue to stir-fry for about 3-5 minutes until the rice is heated through and slightly crispy around the edges.
Step 6: Serve the Beef Pares
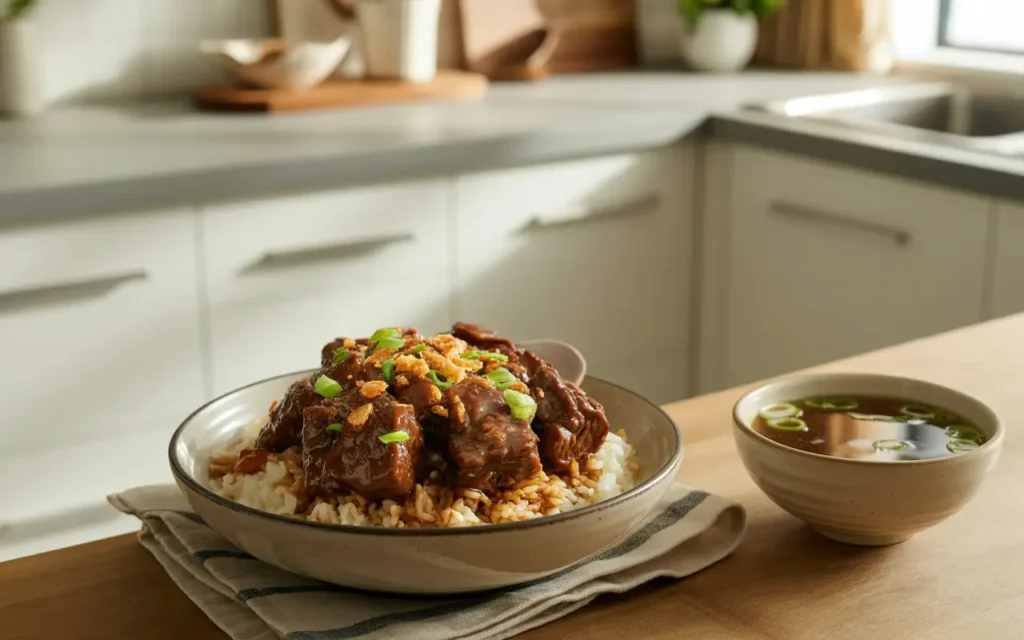
Now comes the fun part—plating this gorgeous dish! Scoop a generous portion of garlic rice onto one side of a plate or bowl. Ladle some of the tender beef and broth next to the rice.
Drizzle the thickened sauce over the beef, and sprinkle with your choice of garnishes—green onions, fried garlic bits, and cilantro all work beautifully.
In the Philippines, beef pares is often served with a small bowl of the broth on the side as a soup. I love this tradition and usually place a small ramekin of the hot broth alongside each serving.
Nutritional Information
I believe in enjoying delicious food while being mindful of what we’re putting in our bodies. As a mom of three active kids, I’m always trying to balance flavor with nutrition. Here’s the breakdown for one serving of this Beef Pares Filipino recipe (including rice):
- Calories: 520
- Protein: 35g
- Carbohydrates: 48g
- Fat: 22g
- Fiber: 2g
- Sugar: 12g
- Sodium: 890mg
Keep in mind that these values can vary based on the exact ingredients and portions you use. The traditional recipe is a bit high in sodium, which is why I use low-sodium beef broth when making it at home.
Healthier Alternatives for the Recipe
While traditional Beef Pares is undeniably delicious, I’ve experimented with several variations to make it more suitable for different dietary needs in our extended family.
When my sister was diagnosed with diabetes last year, I created a lower-carb version that still captures the essence of this beloved dish. Instead of brown sugar, I use a smaller amount of coconut sugar or a sugar substitute like monk fruit sweetener. You’d be surprised how little the flavor profile changes!
For a leaner option, you can substitute beef sirloin for brisket and trim any visible fat. It won’t be quite as melt-in-your-mouth tender, but it still makes for a delicious meal with significantly less fat.
My neighbor follows a gluten-free diet, so when I make this for neighborhood potlucks, I replace the soy sauce with tamari or coconut aminos. The first time I tried coconut aminos, I was skeptical, but it adds a lovely subtle sweetness that works beautifully in this dish.
For a lower-carb alternative to the garlic rice, try serving the beef pares with cauliflower rice sautéed with garlic. My husband was highly suspicious the first time I served this substitution, but even he had to admit it was pretty tasty!
Serving Suggestions
In Filipino eateries known as “paresan,” beef pares is often served with a side of clear soup and chili-infused vinegar for dipping. I recreate this experience at home by offering small bowls of the cooking broth alongside chili vinegar (just mix white vinegar with sliced Thai chilies and let it sit for at least an hour).
This dish is my go-to for Sunday family dinners when everyone gathers around our big oak table. The kids love building their own perfect bite—my son Max always makes sure each forkful has both beef and rice, while my daughter Lily drowns everything in the sauce.
For a complete Filipino-inspired meal, I sometimes serve beef pares with lumpia (Filipino spring rolls) as an appetizer. I’ve shared that recipe on the blog before, and they make a fabulous combination!
When hosting friends, I like to create a small Filipino feast with beef pares as the centerpiece, accompanied by sides like ensaladang talong (eggplant salad) and a simple green mango salad for freshness and acidity to balance the rich beef.
During our backyard summer gatherings, I serve beef pares in individual bowls with all the fixings on the side so everyone can customize their own. It was the star dish at our annual Fourth of July barbecue last year—even though it’s not traditional American fare, it disappeared faster than the hot dogs!
Common Mistakes to Avoid
Through my many attempts at perfecting this recipe, I’ve made practically every mistake possible! Let me save you the trouble:
Not searing the beef properly: The first time I made this, I was in a hurry and crowded too much beef in the pot. The result? Sad, gray meat instead of beautifully caramelized pieces. Take your time with the searing step—it builds an incredible foundation of flavor.
Rushing the cooking time: I once tried to speed up the process by boiling the beef at a higher temperature. Big mistake! The meat turned tough and chewy. Low and slow is the way to go for that melt-in-your-mouth texture we’re after.
Skipping the star anise: During attempt number three, I discovered I was out of star anise and thought, “How important could one little spice be?” Very important, as it turns out! The star anise provides that distinctive, authentic flavor that makes beef pares uniquely beef pares.
Making the sauce too early: On attempt number five, I made the sauce at the beginning and let it sit while the beef cooked. By the time dinner was ready, the sauce had thickened into something resembling cement! Make the sauce shortly before serving for that perfect consistency.
Cooking garlic too long for garlic rice: There was the memorable “black garlic incident” that my family still teases me about. I got distracted by a phone call and returned to a pan of burnt, bitter garlic. Keep a close eye on it—garlic can go from golden to burnt in seconds!
Storing Tips for the Recipe
One of the beautiful things about beef pares is that, like many stews, it actually tastes even better the next day. After the dish has cooled completely, transfer it to an airtight container, separating the beef and broth from the rice and sauce.
The beef in its broth will keep well in the refrigerator for up to 4 days. The garlic rice is best consumed within 2 days, as rice can dry out quickly in the fridge.
If you want to freeze portions for future meals (something I do religiously during busy school seasons), freeze only the beef and broth. The texture of the garlic rice doesn’t hold up well to freezing, so it’s better to make that fresh when you’re ready to eat.
When meal prepping for the week ahead, I store individual portions of beef in broth in glass containers with dividers, with the sauce and garlic rice in separate compartments. This prevents everything from getting soggy and allows for perfect reheating.
Speaking of reheating, the beef and broth reheat beautifully on the stovetop over medium-low heat. For the garlic rice, a quick stir-fry in a hot pan with a small splash of water brings it back to life beautifully.
FAQs
“Can I use a different cut of beef for this recipe?”
Great question! Sarah from Boston asked me this last month. While brisket is traditional for its beautiful marbling and the way it becomes tender when braised, you can substitute chuck roast or even short ribs. Each will give you that tender, fall-apart texture we’re looking for. I wouldn’t recommend leaner cuts like sirloin for the main recipe, as they can become tough with long cooking times.
“I can’t find star anise anywhere! What can I use instead?”
This comes up a lot, especially from readers in smaller towns. While star anise has a unique flavor that’s hard to replicate exactly, you can substitute a mix of ground fennel seeds and a tiny pinch of ground cloves. It won’t be identical, but it’ll give you that licorice-like dimension that’s so important to the dish.
“Is there a way to make this in a slow cooker or Instant Pot?”
Absolutely! Tom from Seattle recently asked about this. For slow cooker, follow steps 1 and 2 as written, then transfer everything to your slow cooker and cook on low for 7-8 hours or high for 4-5 hours. For Instant Pot, use the sauté function for steps 1 and 2, then pressure cook on high for 35 minutes with a 10-minute natural release. The convenience is amazing, though I still prefer the stovetop version when I have time!
“My sauce isn’t thickening properly. What am I doing wrong?”
This is a common issue that Maria from Miami mentioned last week. The key is making sure your cornstarch is fully dissolved in cold water before adding it to the hot liquid. Also, remember that the sauce will continue to thicken as it cools, so it’s okay if it seems a bit thin while still hot.
“Can I make this dish ahead for a dinner party?”
Yes! In fact, I recommend it! When I hosted my in-laws for the first time, I made beef pares the day before and simply reheated it before serving. The extra time allows the flavors to develop even more deeply. Just make the garlic rice fresh right before your guests arrive.
Conclusion
Beef Pares is a perfect example of Filipino comfort food at its finest—tender beef in a sweet-savory broth paired with aromatic garlic rice creates a simple yet deeply satisfying meal. This homemade version brings all the authentic flavors of a Manila street food stall right to your dining table, with the added benefits of controlled ingredients and adjustable flavors.
If you enjoyed this taste of Filipino cuisine, be sure to check out my other Filipino-inspired recipes on the blog. And don’t forget to subscribe for weekly recipes delivered straight to your inbox—I’ve got a Filipino-style chicken adobo coming up next week that you won’t want to miss!
Until next time, happy cooking!