
Introduction
But here’s the thing – mastering this blackened fish recipe wasn’t as simple as I initially thought. I’ll be honest with you, it took me seven attempts (yes, seven!) before I finally nailed the perfect balance of spices and cooking technique. My poor family endured everything from charcoal-tasting disasters to under-seasoned disappointments before I figured out the secret. Now, three years later, this has become our go-to Friday night dinner, and I’m excited to share every trick I’ve learned along the way.
Have you ever wondered why restaurant blackened fish always seems to have that perfect crust while staying incredibly moist inside? Well, my friend, you’re about to discover all my secrets! This blackened fish recipe has become such a hit in our household that my teenage daughter now requests it for her birthday dinner every year instead of going out to a fancy restaurant.
Table of Contents
Ingredients List
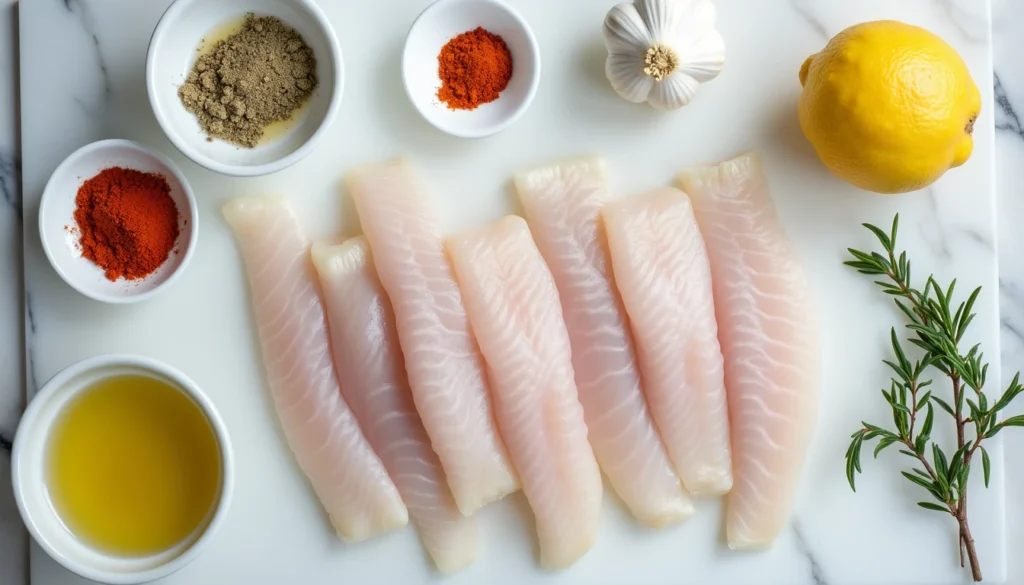
Here’s everything you’ll need for this incredible blackened fish recipe. I’ve learned through trial and error that quality ingredients make all the difference – don’t skimp on the spices!
For the Blackening Seasoning:
- 2 tablespoons paprika (I use sweet Hungarian paprika from my local spice shop)
- 1 tablespoon garlic powder
- 1 tablespoon onion powder
- 1 tablespoon dried thyme (the earthy aroma when you crush it between your fingers is heavenly)
- 1 tablespoon dried oregano
- 1 teaspoon cayenne pepper (adjust to your heat preference – I learned this the hard way!)
- 1 teaspoon black pepper, freshly ground
- 1 teaspoon white pepper
- 1 teaspoon salt (I prefer sea salt from that amazing trip to Maine last year)
For the Fish:
- 4 fish fillets (6-8 oz each) – red snapper, catfish, or mahi-mahi work beautifully
- 1/2 cup unsalted butter, melted
- 2 tablespoons olive oil
- Lemon wedges for serving
Substitution Notes: If you can’t find white pepper, don’t worry – just use an extra teaspoon of black pepper. For those avoiding butter, coconut oil works surprisingly well and adds a subtle tropical note. I discovered this when my sister went dairy-free, and honestly, we couldn’t tell the difference!
Timing
This is one of those recipes that looks fancy but comes together surprisingly quickly – perfect for those hectic weeknight dinners when you want something special without the stress.
Prep Time: 15 minutes (mostly mixing spices and letting the fish rest) Cook Time: 8-10 minutes per batch Total Time: 25-30 minutes
Here’s my personal timing strategy: I usually mix my blackening seasoning on Sunday evenings and store it in a mason jar. This way, I can have dinner on the table in under 20 minutes on busy school nights. The seasoning actually improves in flavor after sitting for a day or two – those spices really get to know each other!
Pro tip from someone who’s learned the hard way: Start heating your cast iron skillet while you’re seasoning the fish. Trust me on this one – you want that pan screaming hot before the fish even thinks about hitting it.
Step-by-Step Instructions

Step 1: Create Your Blackening Seasoning Magic
In a medium bowl, whisk together all your dry seasonings until they’re perfectly combined. I like to make a double batch because this seasoning blend is incredible on chicken and vegetables too. The first time I made this, I was amazed by how the colors swirled together – it’s like watching a Louisiana sunset in a bowl!
Store any extra seasoning in an airtight container. I keep mine in a mason jar with a tight lid, and it stays fresh for up to six months.
Step 2: Prepare Your Fish Fillets
Pat your fish fillets completely dry with paper towels – and I mean completely dry. Any moisture will prevent that gorgeous crust from forming. I learned this lesson after my third failed attempt when I wondered why my “blackened” fish looked more like steamed fish with some spices sprinkled on top!
Brush both sides of each fillet with melted butter, then generously coat with your blackening seasoning. Don’t be shy here – press that seasoning into the fish with your hands. Let the seasoned fillets rest for about 10 minutes while your skillet heats up.
Step 3: Heat Your Skillet to Perfection
Here’s where most people go wrong, and I was guilty of this too in my early attempts. You need a screaming hot cast iron skillet – I’m talking about the kind of heat that makes you question if your smoke detector is working properly. Heat your skillet over medium-high heat for at least 5 minutes before adding any oil.
Add your olive oil to the hot skillet and let it shimmer. You’ll know it’s ready when the oil starts to lightly smoke.
Step 4: The Blackening Magic Happens
Carefully place your seasoned fish fillets in the hot skillet. You should hear an immediate, aggressive sizzle – that’s the sound of success! Don’t move the fish at all for the first 3-4 minutes. I know it’s tempting to peek, but trust the process.
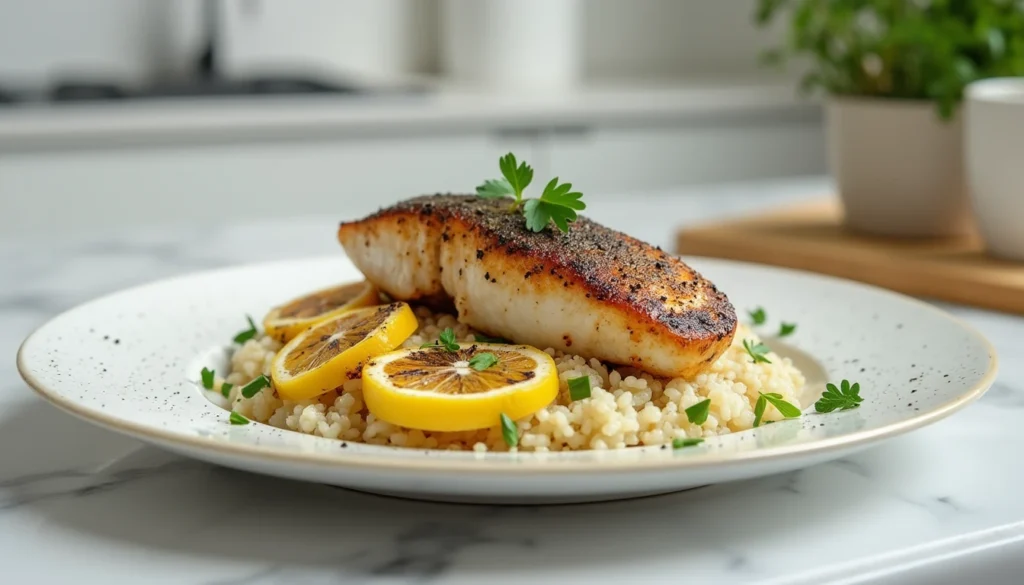
The fish will release naturally from the pan when it’s ready to flip. If it’s sticking, give it another minute. When you do flip it, you should see a beautiful, dark crust that looks almost burnt but smells absolutely incredible.
Step 5: Finish Cooking to Perfection
Cook the second side for another 3-4 minutes, depending on the thickness of your fillets. The fish is done when it flakes easily with a fork and reaches an internal temperature of 145°F.
Here’s my grandmother’s secret test: gently press the center of the fillet with your finger. If it feels firm and springs back, it’s perfect. If it feels mushy, give it another minute.
Step 6: Rest and Serve
Remove the fish from the skillet and let it rest for 2-3 minutes. This allows the juices to redistribute throughout the fish, ensuring every bite is moist and flavorful. Serve immediately with fresh lemon wedges – the bright acidity cuts through the rich spices beautifully.
Nutritional Information
As someone who believes in enjoying delicious food while maintaining a balanced lifestyle, I love that this blackened fish recipe is both indulgent-tasting and nutritious. Here’s what you’re getting per serving:
- Calories: 285
- Protein: 42g
- Carbohydrates: 3g
- Fat: 12g
- Fiber: 1g
- Sodium: 680mg
- Potassium: 520mg
The high protein content makes this perfect for my family’s active lifestyle – my husband coaches little league, and my daughter plays soccer, so we need meals that fuel their energy. The relatively low carb count also makes this a great option when I’m trying to balance out a day that might have included too many of my famous chocolate chip cookies!
The spices in this recipe aren’t just for flavor – they’re packed with antioxidants. Paprika contains vitamin A, while the garlic and onion powders provide immune-boosting properties. It’s like getting a health supplement disguised as the most delicious dinner ever.
Healthier Alternatives for the Recipe
Over the years, I’ve adapted this blackened fish recipe to accommodate various dietary needs in our extended family. Here are some modifications that maintain all the flavor while addressing different health goals:
For Lower Sodium Needs: Reduce the salt in the seasoning blend to 1/2 teaspoon and add an extra teaspoon of garlic powder for flavor depth. My father-in-law has to watch his sodium intake, and he can’t tell the difference with this adjustment.
For Dairy-Free Diets: Replace the butter with coconut oil or avocado oil. I discovered this when my sister went dairy-free, and honestly, the coconut oil adds a subtle sweetness that complements the spices beautifully.
For Heart-Healthy Options: Use fatty fish like salmon or mackerel instead of white fish. The omega-3s pair wonderfully with the anti-inflammatory properties of the spices.
For Lower Fat Content: Skip the butter altogether and use cooking spray in your pan. The fish will still develop a beautiful crust, though it won’t be quite as rich.
For Keto-Friendly Meals: This recipe is already perfect for low-carb diets! Just serve it over cauliflower rice instead of regular rice, and you’ve got a complete keto meal.
Serving Suggestions
This blackened fish recipe is incredibly versatile, and over the years, I’ve discovered some amazing combinations that have become family favorites.
Classic Southern Style: Serve over creamy grits with a side of sautéed collard greens. This was inspired by our New Orleans trip, and it brings back those vacation memories every time.
Fresh Summer Approach: Place the fish over a bed of mixed greens with cherry tomatoes, cucumber, and a light lemon vinaigrette. Perfect for those hot July evenings when you want something satisfying but not heavy.
Family Taco Night: Flake the fish and serve in warm tortillas with shredded cabbage, diced tomatoes, and a dollop of Greek yogurt. My kids discovered this combination by accident, and now it’s requested at least twice a month!
Comfort Food Classic: Pair with garlic mashed potatoes and steamed broccoli. This is my go-to Sunday dinner combination, especially during football season.
Healthy Bowl Option: Serve over quinoa with roasted vegetables and a squeeze of fresh lime. This has become my daughter’s favorite post-soccer practice meal.
Instead of traditional wine pairings, I love serving this with fresh fruit-infused water or unsweetened iced tea with lemon. The clean, refreshing drinks complement the bold spices without competing for attention.
Common Mistakes to Avoid
Through my many attempts (and failures!) at perfecting this recipe, I’ve identified the most common pitfalls that can turn your blackened fish dreams into a smoky nightmare.
Mistake #1: Using a Cold Skillet The first time I made this recipe, I was so excited that I put the fish in a lukewarm pan. The result? Sad, gray fish with spices that just sat on top instead of creating that gorgeous crust. Your skillet needs to be hot enough that a drop of water sizzles and evaporates immediately.
Mistake #2: Moving the Fish Too Soon I learned this lesson the hard way during attempt number four. When you flip the fish too early, you lose that beautiful crust and end up with a mess. The fish will naturally release from the pan when it’s ready – trust the process!
Mistake #3: Using Too Much Oil More oil doesn’t equal better results. I discovered this during a particularly disastrous attempt where I practically deep-fried the fish. Just a light coating is all you need – the butter on the fish provides enough fat for proper cooking.
Mistake #4: Skimping on the Seasoning Don’t be shy with that spice blend! The first couple of times I made this, I was too conservative with the seasoning, and the fish tasted bland despite looking blackened. Press that seasoning into the fish like you mean it.
Mistake #5: Overcrowding the Pan I learned this during a dinner party disaster when I tried to cook eight fillets in one pan. They steamed instead of searing, and I had to start over. Cook in batches if necessary – your guests will wait happily for perfection!
Storing Tips for the Recipe
One of the things I love most about this blackened fish recipe is how well it stores and reheats, making it perfect for meal prep or enjoying leftovers.
Refrigerator Storage: Cooked blackened fish will keep in the refrigerator for up to 3 days when stored in an airtight container. I usually meal prep this on Sundays, and it maintains its amazing flavor throughout the week. Just let it cool completely before refrigerating.
Freezer Storage: While fresh is always best, you can freeze cooked blackened fish for up to 2 months. Wrap individual portions in plastic wrap, then place in freezer bags. Label with the date – trust me, everything looks the same after a month in the freezer!
Reheating Tips: The key to reheating blackened fish is gentle heat. I prefer using a 350°F oven for about 10 minutes, which helps maintain the texture. Avoid the microwave if possible – it can make the fish rubbery.
Make-Ahead Strategy: You can prepare the seasoning blend up to 6 months in advance and store it in an airtight container. I also like to season the fish up to 4 hours ahead of time and keep it covered in the refrigerator. This actually improves the flavor as the spices have more time to penetrate the fish.
Leftover Magic: Don’t just reheat leftover blackened fish – transform it! Flake it into fish cakes, add it to omelets, or use it in fish tacos. Some of our family’s favorite meals have come from creative leftover reinventions.
FAQs
Over the years of sharing this recipe with friends and family, I’ve gotten quite a few questions. Here are the most common ones:
Q: Can I use frozen fish for this recipe? A: Absolutely! Just make sure to thaw it completely and pat it very dry. I actually prefer using individually frozen fillets from my local grocery store – they’re often fresher than the “fresh” fish that’s been sitting in the display case. Sarah from my book club uses frozen mahi-mahi all the time with fantastic results.
Q: My smoke detector goes off every time I make this. Is that normal? A: Ha! You’re not alone – this happened to me during my second attempt, and my neighbor thought my kitchen was on fire! The high heat and spices do create smoke, so make sure your exhaust fan is running and crack a window if needed. It’s worth it for that perfect crust, I promise.
Q: Can I make this recipe without a cast iron skillet? A: While cast iron is ideal for heat retention, you can use a heavy-bottomed stainless steel pan. Just make sure it gets really hot before adding the fish. My sister-in-law uses her stainless steel pan with great success.
Q: How spicy is this recipe? A: With one teaspoon of cayenne, it has a nice kick but isn’t overwhelming. My 12-year-old daughter eats it happily. If you’re sensitive to heat, start with 1/2 teaspoon of cayenne and adjust from there.
Q: What’s the best fish to use for beginners? A: I recommend starting with catfish or red snapper – they’re forgiving and hold up well to the high heat. Mahi-mahi is also excellent if you can find it fresh. Avoid delicate fish like sole or flounder for this recipe.
Q: Can I grill this instead of using a skillet? A: While you can grill blackened fish, you won’t get quite the same crust development. If you do grill, make sure your grates are extremely clean and well-oiled, and use high heat.
Conclusion
This blackened fish recipe has truly become a cornerstone of our family’s dinner rotation, and I hope it brings as much joy to your kitchen as it has to mine. The combination of bold spices, perfect technique, and that incredible contrast between the crispy crust and tender fish inside never fails to impress both family and guests.
Remember, the key to success lies in that screaming hot skillet, generous seasoning, and patience during the cooking process. Don’t be discouraged if your first attempt isn’t perfect – it took me seven tries to get it right, and now it’s second nature!
If you enjoyed this recipe, I’d be so grateful if you could leave a review below and let other home cooks know how it turned out for you. Your feedback helps me create even better content for our wonderful cooking community. And don’t forget to subscribe to the blog for more family-tested recipes that bring people together around the dinner table – because that’s what cooking is really all about!
Happy cooking, my friends, and remember – every great dish starts with a little love and a lot of enthusiasm!