
Introduction
Have you ever wondered how to transform those humble cans of beef into meals that your family will actually request again? Trust me, I’ve been on a years-long journey experimenting with recipes using canned beef, and I’m thrilled to share what I’ve learned with you all today.
Let me tell you a secret – I tried at least a dozen different approaches before landing on these recipes that my family now considers comfort food. The best part? These recipes using canned beef have saved my dinner plans countless times when I’ve forgotten to defrost meat or when unexpected guests show up. They’re my pantry heroes!
Table of Contents
Hearty Canned Beef Stroganoff
Ingredients List

- 2 cans (12 oz each) of beef, drained and shredded
- 2 tablespoons olive oil (I use the cold-pressed one I discovered at that little farmer’s market in Vermont)
- 1 large onion, thinly sliced
- 8 oz mushrooms, sliced (cremini work wonderfully, but white button mushrooms are great too)
- 3 cloves garlic, minced (or more if you’re like my husband who believes there’s no such thing as too much garlic)
- 2 tablespoons flour
- 1 cup beef broth (low-sodium works best since the canned beef already contains salt)
- 1 tablespoon Worcestershire sauce
- 1 teaspoon Dijon mustard
- 1 cup sour cream (full-fat gives the creamiest results, but light works in a pinch)
- Salt and freshly ground black pepper to taste
- 8 oz egg noodles, cooked according to package directions
- Fresh parsley, chopped, for garnish
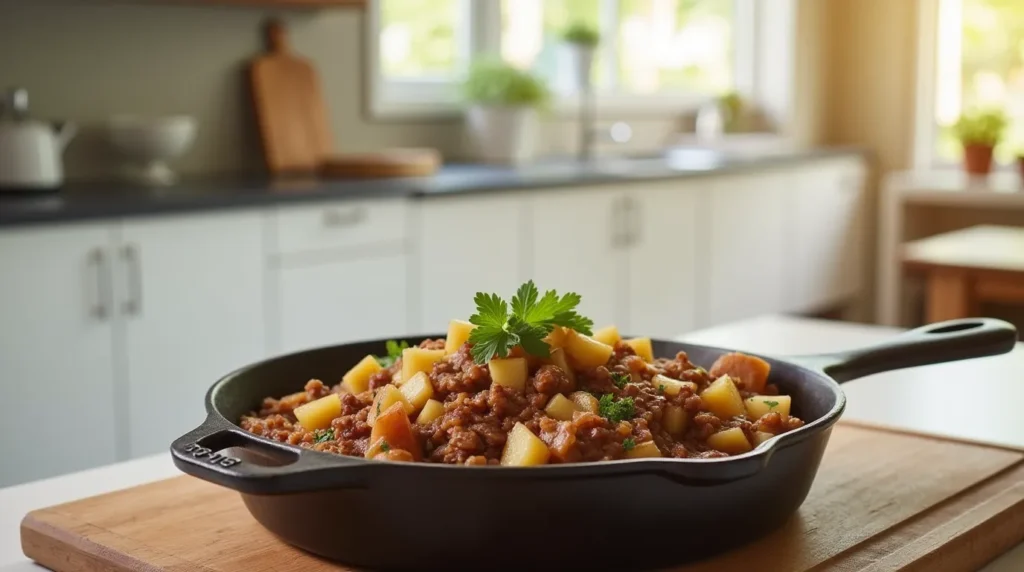
You’ll notice the beautiful savory aroma the moment you start cooking the onions with the beef – it’s that rich umami scent that always brings my teenagers wandering into the kitchen asking, “How soon until dinner?”
Timing
Prep time: 15 minutes
Cook time: 25 minutes
Total time: 40 minutes
This is my go-to recipe for Thursday nights when my daughter has ballet and my son has soccer practice. I can have it on the table within 45 minutes of walking through the door, which is a lifesaver when everyone comes home starving. I often chop the onions and mushrooms the night before to save even more time.
Step-by-Step Instructions
Step 1: Prepare Your Ingredients
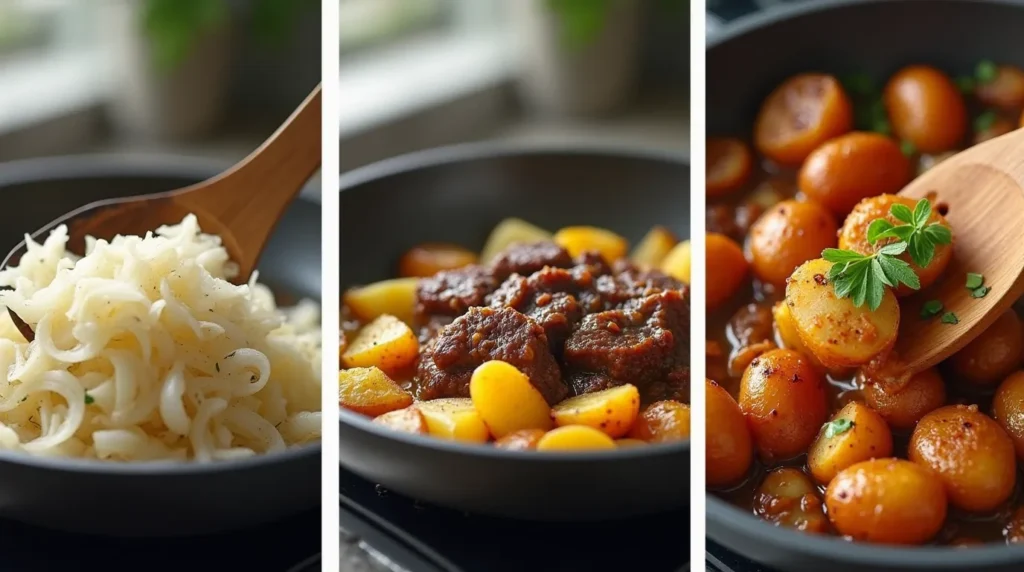
Begin by gathering all your ingredients – there’s nothing worse than getting halfway through a recipe and realizing you’re missing something essential! Drain your canned beef and shred it slightly with a fork. The first time I made this stroganoff, I left the beef in large chunks, and it didn’t absorb the flavors as well. Breaking it up a bit makes all the difference!
Step 2: Sauté the Vegetables
Heat olive oil in a large skillet over medium heat. Add the sliced onions and cook until they’re translucent, about 3-4 minutes. The trick here is to be patient – I used to rush this step, but I’ve learned that allowing the onions to properly soften creates a much better flavor base.
Add the mushrooms and continue cooking until they’ve released their moisture and started to brown, approximately 5-7 minutes. Trust me, letting the mushrooms brown adds incredible depth to this dish! Stir in the minced garlic and cook for another 30 seconds until fragrant.
Step 3: Create the Sauce Base
Sprinkle the flour over the vegetable mixture and stir constantly for about a minute. This step is crucial – cooking the flour removes that raw taste that can ruin a good sauce. I learned this tip from my grandmother who was always whisking away at perfect sauces in her kitchen.
Gradually add the beef broth while stirring continuously to prevent lumps. Once smooth, add the Worcestershire sauce and Dijon mustard. These ingredients might seem small, but they’re the secret to making canned beef taste like you spent hours cooking it!
Step 4: Add the Beef
Gently fold in the shredded canned beef and let it simmer in the sauce for about 5-7 minutes. This gives the meat time to absorb all those wonderful flavors you’ve developed. The first time I made this recipe, I added the beef too early, and it broke down too much – timing really matters here!
Step 5: Finish with Sour Cream
Remove the skillet from heat and let it cool slightly (about 2 minutes). This is important because adding sour cream to a boiling mixture can cause it to curdle. Stir in the sour cream until completely incorporated. Season with salt and pepper to taste, remembering that canned beef already contains some salt.
Step 6: Serve and Enjoy
Serve your stroganoff over cooked egg noodles and garnish with fresh parsley. My husband prefers his over mashed potatoes, while my kids are egg noodle enthusiasts – feel free to choose your family’s favorite!
Nutritional Information
Per serving (makes 6 servings):
- Calories: 385
- Protein: 24g
- Carbohydrates: 30g
- Fat: 18g
- Fiber: 2g
- Sodium: 480mg
As a blogger who’s always trying to balance flavor with nutrition, I appreciate that this dish provides substantial protein while still feeling indulgent. The mushrooms add extra nutrients and help stretch the meat, something I always try to incorporate into our family meals.
Healthier Alternatives for the Recipe
- Lighter version: Use light sour cream or plain Greek yogurt instead of full-fat sour cream. I started doing this after my annual physical showed my cholesterol was creeping up, and honestly, my family didn’t even notice the switch!
- Lower carb option: Serve over cauliflower rice or zucchini noodles instead of egg noodles. My niece who follows a keto diet taught me this trick during her last visit, and it’s become a regular option in our house.
- Gluten-free adaptation: Use 1 tablespoon cornstarch instead of flour for thickening, and serve with gluten-free pasta. When my daughter’s best friend who has celiac comes for dinner, this is how I modify the recipe, and it turns out beautifully every time.
Serving Suggestions
This stroganoff pairs wonderfully with a crisp green salad dressed simply with lemon juice and olive oil. The brightness cuts through the richness of the dish perfectly. I love serving this meal when my in-laws come for Sunday dinner – it’s impressive enough for company but doesn’t keep me in the kitchen all day.
For a complete comfort food experience, add some steamed green beans or roasted broccoli on the side. My kids are much more likely to eat their vegetables when they’re served alongside this family favorite!
A basket of warm dinner rolls is also lovely with this, perfect for soaking up every last bit of that delicious sauce. During the holidays, I serve this with cranberry sauce on the side – the tartness is a surprising but delightful companion to the rich stroganoff.
Southwest Canned Beef Enchilada Casserole
Ingredients List
- 2 cans (12 oz each) of beef, drained
- 1 tablespoon olive oil
- 1 medium onion, diced
- 1 red bell pepper, diced
- 1 green bell pepper, diced
- 2 cloves garlic, minced
- 1 tablespoon chili powder
- 2 teaspoons ground cumin
- 1 teaspoon dried oregano
- 1 can (14.5 oz) diced tomatoes with green chilies
- 1 can (15 oz) black beans, drained and rinsed
- 1 cup frozen corn kernels
- 1/4 cup fresh cilantro, chopped (plus more for garnish)
- 12 corn tortillas
- 2 cups shredded Mexican cheese blend
- 1 can (10 oz) red enchilada sauce
- Sour cream and sliced avocado, for serving
You’ll love the colorful appearance of this dish – it’s like a fiesta on a plate! The aroma of cumin and chili powder will fill your kitchen with the most mouthwatering scent. I discovered this recipe when trying to recreate the flavors of a little taqueria we visited on our road trip through New Mexico.
Timing
Prep time: 20 minutes
Cook time: 35 minutes
Total time: 55 minutes
This enchilada casserole is my Saturday afternoon specialty. I often make it when we have my son’s baseball teammates over after games – it feeds a crowd and can be prepared ahead of time. Just assemble everything up to 24 hours in advance, refrigerate, and add an extra 10-15 minutes to the baking time when you’re ready to cook it.
Step-by-Step Instructions
Step 1: Prepare Your Filling
Preheat your oven to 375°F and lightly grease a 9×13 inch baking dish.
Heat olive oil in a large skillet over medium heat. Add onion and bell peppers, cooking until softened, about 5 minutes. Add the garlic, chili powder, cumin, and oregano, and cook for another minute until fragrant.
The first time I made this recipe, I wasn’t generous enough with the spices and the result was bland. Don’t be afraid to let those spices bloom in the hot oil – it’s the key to authentic flavor!
Step 2: Combine with Canned Beef
Add the drained canned beef to the skillet, breaking it up with a spoon. Stir in diced tomatoes with chilies, black beans, corn, and cilantro. Let this mixture simmer for about 5 minutes so the flavors can meld together.
Trust me, this step is where magic happens – the beef absorbs all those southwestern spices and transforms from simple canned meat into something truly special!
Step 3: Assemble the Casserole
Pour a thin layer of enchilada sauce on the bottom of your prepared baking dish. Layer 4 corn tortillas over the sauce, tearing them if needed to cover the bottom. Spoon one-third of the beef mixture over the tortillas, then sprinkle with one-third of the cheese.
Repeat the layers twice more: tortillas, sauce, beef mixture, and cheese. Finally, pour any remaining enchilada sauce over the top and sprinkle with the last of the cheese.
This layering technique is something I learned from my neighbor Rosa, who grew up in Mexico City. She taught me that layering the ingredients this way ensures every bite has the perfect balance of flavors.
Step 4: Bake to Perfection
Cover the dish with aluminum foil and bake for 20 minutes. Then remove the foil and bake for an additional 10-15 minutes until the cheese is bubbly and starting to brown.
Let the casserole rest for about 5-10 minutes before serving – I know it’s tempting to dig right in (my family starts circling the kitchen like hungry wolves when they smell it), but this resting period helps the layers set up nicely for serving.
Step 5: Serve and Garnish
Garnish with additional fresh cilantro, dollops of sour cream, and sliced avocado. I like to put these toppings in separate bowls and let everyone customize their own portion – it makes dinner feel special and interactive.
Nutritional Information
Per serving (makes 8 servings):
- Calories: 420
- Protein: 26g
- Carbohydrates: 42g
- Fat: 17g
- Fiber: 7g
- Sodium: 650mg
As someone who values balanced nutrition, I love that this dish incorporates protein, vegetables, and whole grains in one delicious package. The black beans add fiber and additional protein, making the canned beef stretch further while adding nutrition.
Healthier Alternatives for the Recipe
- Reduce sodium: Use low-sodium canned products and reduce the added cheese to lower the overall sodium content. When my dad was put on a low-sodium diet last year, these simple swaps made it possible for him to still enjoy family dinner nights.
- Add more veggies: Incorporate diced zucchini, spinach, or carrots to increase the vegetable content. My kids don’t even notice the extra veggies when they’re mixed into this flavorful dish!
- Whole grain option: Use whole wheat tortillas instead of corn tortillas for additional fiber. I started doing this after reading about the benefits of whole grains in my nutrition course.
Serving Suggestions
This enchilada casserole is a meal in itself, but I love serving it with a simple side salad of mixed greens, cucumber, and tomato with a lime vinaigrette. The fresh, crisp salad provides a nice contrast to the warm, cheesy casserole.
For festive occasions like Cinco de Mayo or when friends come over for game night, I set up a toppings bar with extra diced avocado, sliced jalapeños, diced tomatoes, and lime wedges so everyone can customize their serving.
Quick Canned Beef Curry
Ingredients List
- 2 cans (12 oz each) of beef, drained
- 2 tablespoons coconut oil or vegetable oil
- 1 large onion, finely diced
- 3 cloves garlic, minced
- 1 tablespoon fresh ginger, grated (I keep mine in the freezer and grate it frozen – so much easier!)
- 2-3 tablespoons curry powder (depending on your spice preference)
- 1 teaspoon ground turmeric
- 1/2 teaspoon ground cinnamon
- 1/4 teaspoon ground cardamom
- 1 can (14 oz) diced tomatoes
- 1 can (14 oz) coconut milk
- 1 cup beef broth
- 2 potatoes, peeled and diced into 1/2-inch cubes
- 1 cup frozen peas
- Fresh cilantro, chopped, for garnish
- Cooked basmati rice, for serving
The aroma of this curry is absolutely intoxicating – warm, exotic spices that transport you to faraway places right from your kitchen! I first experimented with this recipe after a memorable trip to an Indian restaurant in Chicago that changed my perception of curry forever.
Timing
Prep time: 15 minutes
Cook time: 30 minutes
Total time: 45 minutes
This curry has saved me on countless busy weeknights. I typically make it on Mondays when we’re all adjusting back to the work/school routine and need something comforting but quick. The leftovers taste even better the next day, making it perfect for lunch meal prep.
Step-by-Step Instructions
Step 1: Create the Flavor Base
Heat coconut oil in a large pot or Dutch oven over medium heat. Add onions and cook until softened and translucent, about 5 minutes. Add garlic and ginger, cooking for another minute until fragrant.
The first time I made this curry, I rushed this step, but I’ve learned that giving the onions proper time to soften is crucial for developing the foundational flavors. My grandmother always said, “Good cooking can’t be rushed,” and she was right!
Step 2: Bloom the Spices
Add curry powder, turmeric, cinnamon, and cardamom to the pot. Stir constantly for 1-2 minutes until the spices are toasted and aromatic. This step is magical – you’ll literally see the transformation as the spices bloom in the hot oil and release their essential oils. Trust me, this makes all the difference between a good curry and an amazing one!
Step 3: Add Liquids and Potatoes
Pour in the diced tomatoes with their juice, coconut milk, and beef broth. Stir well to combine, making sure to scrape up any spices that might be sticking to the bottom of the pot.
Add the diced potatoes, bring the mixture to a simmer, then reduce heat to maintain a gentle simmer. Cover and cook for about 15 minutes, or until the potatoes are just tender when pierced with a fork.
Step 4: Add Canned Beef and Peas
Gently stir in the drained canned beef and frozen peas. Simmer uncovered for another 5-10 minutes, allowing the beef to heat through and the sauce to thicken slightly.
I learned through trial and error that adding the canned beef too early can cause it to break down too much and lose its texture. Adding it at this later stage keeps it tender but intact.
Step 5: Final Seasoning and Serving
Taste and adjust seasonings as needed. Sometimes I add a squeeze of fresh lime juice at the end – it brightens all the flavors in a wonderful way!
Serve hot over basmati rice, garnished with fresh cilantro. For an authentic touch, I sometimes serve it with a dollop of plain yogurt on the side to cool the spices.
Nutritional Information
Per serving (makes 6 servings):
- Calories: 395
- Protein: 22g
- Carbohydrates: 28g
- Fat: 22g
- Fiber: 4g
- Sodium: 520mg
As a blogger who cares about balanced nutrition, I appreciate that this curry provides a good balance of protein, carbs, and vegetables. The coconut milk adds healthy fats that help your body absorb the turmeric’s anti-inflammatory compounds – something I learned about when researching foods that might help my mother’s arthritis.
Healthier Alternatives for the Recipe
- Lower fat option: Use light coconut milk instead of full-fat to reduce the calorie and fat content. I started doing this after my sister’s nutritionist recommended reducing saturated fats in her diet.
- More veggies: Add cauliflower florets, diced carrots, or spinach for extra nutrition and fiber. My rule of thumb is: the more colorful the curry, the more nutritious it is!
- Lower carb version: Substitute cauliflower rice for basmati rice. My neighbor introduced me to this swap during her carb-conscious diet phase, and it’s become a regular option in our house.
Serving Suggestions
I love serving this curry with a simple cucumber and tomato salad dressed with lemon juice and a sprinkle of salt – the cool, fresh salad balances the warm spices of the curry beautifully.
Common Mistakes to Avoid When Cooking with Canned Beef
Skipping the Draining Step
Always drain canned beef thoroughly before using it in recipes. The first time I made beef curry, I skipped this step and ended up with a watery, over-salted dish that my husband still teases me about years later! The liquid in the can contains a lot of sodium and can throw off both the flavor and texture of your final dish.
Not Adding Enough Flavor
Canned beef has a milder flavor than fresh beef. Compensate by being generous with aromatics like onions, garlic, and herbs. My early attempts at cooking with canned beef were underwhelming until I realized I needed to amp up the supporting flavors. Now I add at least twice the garlic and herbs that I would use with fresh meat!
Overcooking
Since canned beef is already fully cooked, it needs minimal cooking time – just enough to heat through and absorb flavors. I once simmered a canned beef stew for hours like I would with fresh meat, and it disintegrated into an unappetizing texture. Learn from my mistake: add the canned beef toward the end of the cooking process when possible.
Not Breaking It Up
Canned beef often comes packed in large chunks. For most recipes, breaking it up with a fork creates a better texture and helps it absorb flavors more effectively. The first time I made enchiladas with canned beef, I left it in large chunks, and the filling was inconsistent. Now I always take an extra minute to break it up properly.
Storing Tips for Recipes Using Canned Beef
Refrigerator Storage
All three recipes will keep well in airtight containers in the refrigerator for 3-4 days. I’m a Sunday meal-prep enthusiast, and these dishes are perfect for making ahead – in fact, the stroganoff and curry actually taste better the next day once the flavors have had time to meld!
For the enchilada casserole, I recommend cutting it into portions before refrigerating – it’s much easier to reheat individual servings than trying to warm the entire casserole again.
Freezer-Friendly Options
Both the beef curry and the enchilada casserole freeze beautifully for up to 3 months. I often make double batches specifically to freeze half for those hectic weeks when cooking from scratch just isn’t happening.
The stroganoff, however, is best enjoyed fresh or refrigerated due to the dairy content – the sour cream can separate a bit when frozen and thawed. I learned this the hard way after freezing a big batch for my daughter’s graduation party!
Reheating Best Practices
For best results when reheating:
- Stroganoff: Warm gently on the stovetop with a splash of beef broth to refresh the sauce.
- Enchilada Casserole: Microwave individual portions covered with a damp paper towel, or reheat in a 325°F oven until warmed through.
- Curry: Reheat on the stovetop over medium-low heat, adding a little water or broth if it seems too thick.
FAQs About Cooking with Canned Beef
Is canned beef already cooked?
Yes! This is one of its biggest advantages. Melissa from Ohio recently asked me about this, and I explained that canned beef is fully cooked during the canning process, which is why it’s so convenient for quick meals. You just need to heat it through and season it well.
How can I reduce the sodium in recipes using canned beef?
This is a great question that Sarah from Atlanta asked last month. I recommend thoroughly rinsing and draining the beef before using it, using low-sodium broths and sauces in your recipes, and being cautious with adding additional salt until you’ve tasted the dish. Incorporating plenty of fresh vegetables and herbs also helps balance the sodium content with other flavors.
Can I substitute canned beef in recipes that call for ground beef?
Absolutely! Janet from Seattle was wondering about this, and I’ve done it many times. Canned beef works wonderfully in recipes like chili, pasta sauces, and casseroles that traditionally use ground beef. Just remember that the texture will be slightly different, and you may want to adjust seasonings accordingly.
Does canned beef have the same nutritional value as fresh beef?
This is something Mark from Denver asked me recently. Canned beef retains most of the protein and minerals of fresh beef, though it’s higher in sodium. The canning process doesn’t significantly affect the protein quality, making it a convenient way to include protein in your diet when fresh options aren’t available.
How long does unopened canned beef last in the pantry?
Denise from Chicago asked about this after finding some cans in her mom’s pantry. Generally, canned beef can last 3-5 years in a cool, dry place if the can remains undamaged. Always check for any signs of spoilage (bulging cans, off odors) before using, but properly stored canned beef is one of the most shelf-stable protein sources you can keep on hand!
Conclusion
These recipes using canned beef have transformed how I think about pantry staples. From a hearty stroganoff that comforts on cold evenings to a bright, spicy enchilada casserole perfect for feeding a crowd, canned beef has proven itself as much more than just an “emergency” ingredient in my kitchen.
What I love most about these dishes is how they combine convenience with homemade flavor – something that’s especially valuable in our busy lives. The beef curry particularly has become a Monday night tradition in our house, bringing exotic flavors to the table with minimal effort.