
Introduction
Have you ever tasted perfectly smoked salmon and wondered if you could recreate that magic in your own kitchen? Trust me, you absolutely can. After countless experiments (and yes, a few more smoky disasters my husband still teases me about), I’ve developed foolproof techniques for creating restaurant-quality smoked fish that will impress even your most food-snobby friends.
Let me share my journey with these smoked fish recipes—from beginner to backyard smoking enthusiast. I’ve tested every method, from stovetop smoking to DIY smoker setups, and I’m about to spill all my hard-earned secrets. Whether you’re craving smoky salmon for your Sunday bagel brunch or want to wow dinner guests with smoked trout that melts in your mouth, I’ve got you covered.
Table of Contents
Ingredients List
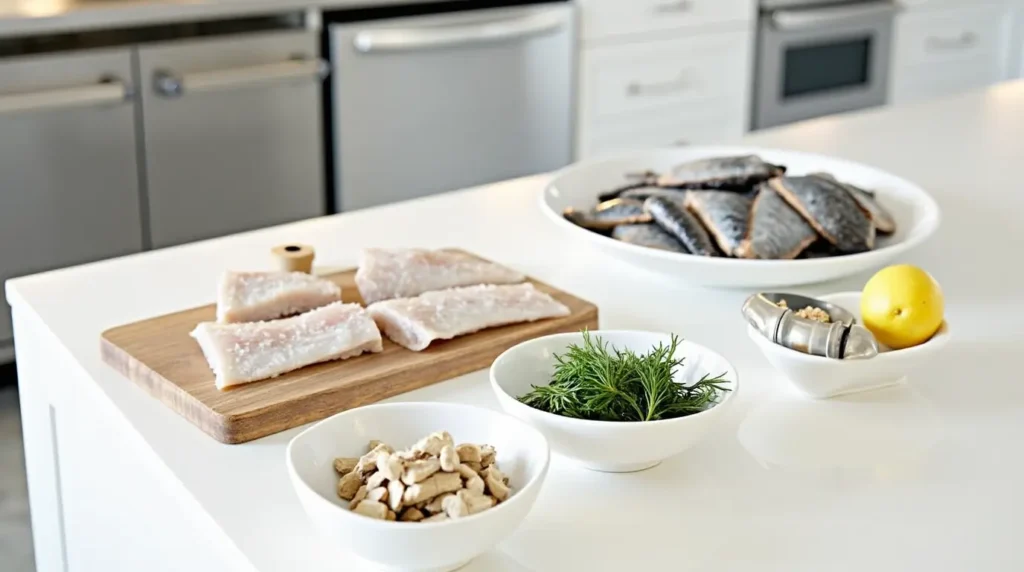
For Basic Smoked Salmon:
- 2 pounds fresh salmon fillets (I usually get mine from Pete at the Saturday farmers market—he always saves me the best cuts)
- 1/4 cup kosher salt (Diamond Crystal is my go-to brand)
- 1/4 cup brown sugar (dark brown gives a deeper molasses flavor I adore)
- 1 tablespoon freshly ground black pepper
- Optional aromatics: 2 tablespoons fresh dill (from my herb garden), zest of 1 lemon, 1 teaspoon garlic powder
When you’re choosing salmon, look for that vibrant orange-pink color and firm flesh. I still remember the first time I handled truly fresh salmon—there’s this subtle sweet aroma that tells you it’s perfect for smoking. If salmon isn’t your thing, this recipe works beautifully with trout, whitefish, or even mackerel (which my daughter Sophie surprisingly prefers).
For wood chips, I recommend apple or alder for beginners—they provide a gentle smoke that won’t overpower the delicate fish flavors. Cherry wood is another family favorite that we discovered during our trip to Michigan’s Upper Peninsula last summer.
For Smoked Trout with Herbs:
- 2 pounds fresh trout fillets (skin-on)
- 1/4 cup sea salt (I found this amazing Maine sea salt at a little coastal shop during our family vacation)
- 3 tablespoons maple syrup (the real stuff, not pancake syrup—trust me on this!)
- 2 tablespoons fresh thyme leaves
- 1 tablespoon cracked peppercorns
- Zest of 1 orange
When you open that package of fresh thyme, you’ll notice an earthy, slightly floral aroma that pairs magically with the sweet notes of the maple syrup. This combination transformed my understanding of smoked fish when I first experimented with it three years ago.
Timing
Preparation Time:
- Brining: 8-12 hours (I usually set this up before bed so it’s ready in the morning)
- Drying/Pellicle Formation: 2-3 hours
- Actual Smoking Time: 1-3 hours depending on thickness and technique
I’ve learned that rushing the brining process is the easiest way to ruin good fish. Those weeknight dinners when I’ve tried to cut corners? Total disappointments. Now I plan ahead, usually starting my fish projects on Friday nights so we can enjoy the results for our lazy Saturday brunches when the kids don’t have soccer practice.
The drying time is non-negotiable too—I fold laundry or catch up on my favorite podcasts while waiting for that tacky pellicle to form. This is one of those recipes where patience truly pays off, and after you taste the difference, you’ll understand why.
Step-by-Step Instructions
Step 1: Prepare Your Fish (20 minutes)
Check your fish fillets for any remaining bones. The first time I served smoked salmon to my in-laws, my father-in-law found a pin bone, and I was mortified! Now I always run my fingers against the grain of the flesh to feel for any hidden bones and remove them with fish tweezers.
Rinse your fillets under cold water and pat them completely dry with paper towels. Cut larger fillets into more manageable pieces—about 4-5 inches wide. This ensures more even smoking and easier handling.
Step 2: Mix Your Cure (5 minutes)
In a bowl, combine your salt, sugar, and spices. For my salmon cure, I use my hands to really blend those ingredients together—there’s something satisfying about feeling the sugar and salt mixture come together that a spoon just doesn’t provide.
The first time I made this, I went overboard with the salt (my husband still hasn’t let me forget it). The perfect ratio I’ve found is equal parts salt to sugar, with spices making up no more than 1/4 of the total mixture.
Step 3: Apply the Cure (10 minutes)
Line a glass baking dish with plastic wrap (this makes cleanup so much easier—a trick I learned from my mom). Sprinkle about 1/3 of your cure mixture on the bottom, place your fish skin-side down, then cover the flesh completely with the remaining cure.
Press the cure gently into the flesh. You’ll notice the surface becoming slightly wet almost immediately—that’s the cure beginning to draw moisture from the fish, exactly what we want!
Step 4: Brine (8-12 hours)
Cover the dish tightly with plastic wrap and refrigerate. For a light cure, 8 hours works beautifully. For a more intense flavor (which my teenage son prefers), go for the full 12 hours.
When my friend Sarah tried this recipe, she accidentally left it curing for 24 hours—the fish was still delicious but definitely on the saltier side. If you do over-cure, just soak the fish in cold water for 30 minutes before smoking.
Step 5: Rinse and Dry (10 minutes + 2-3 hours waiting)
Rinse the cure off thoroughly under cold running water. The first time I skipped this step, thinking a saltier result would be tastier—big mistake! You’ll know you’ve rinsed enough when the surface feels clean rather than grainy.
Pat dry with paper towels, then place on a rack over a baking sheet. Here’s the important part that I learned the hard way: let the fish dry uncovered in the refrigerator for 2-3 hours. This develops what’s called a “pellicle”—a slightly tacky, dry surface that the smoke adheres to. Trust me, don’t skip this!
Step 6: Prepare Your Smoker (15 minutes)
Whether you’re using a dedicated smoker, a charcoal grill, or my favorite beginner method—a stovetop smoker—the principles are the same. You want to create gentle, indirect heat and consistent smoke.
For a stovetop smoker (which is how I started my smoking journey in our tiny apartment), line the bottom with aluminum foil, add 2 tablespoons of wood chips, and place the drip tray and rack on top.
For a charcoal grill, set up for indirect heat with coals on one side only. Place a foil packet of soaked wood chips on the coals.
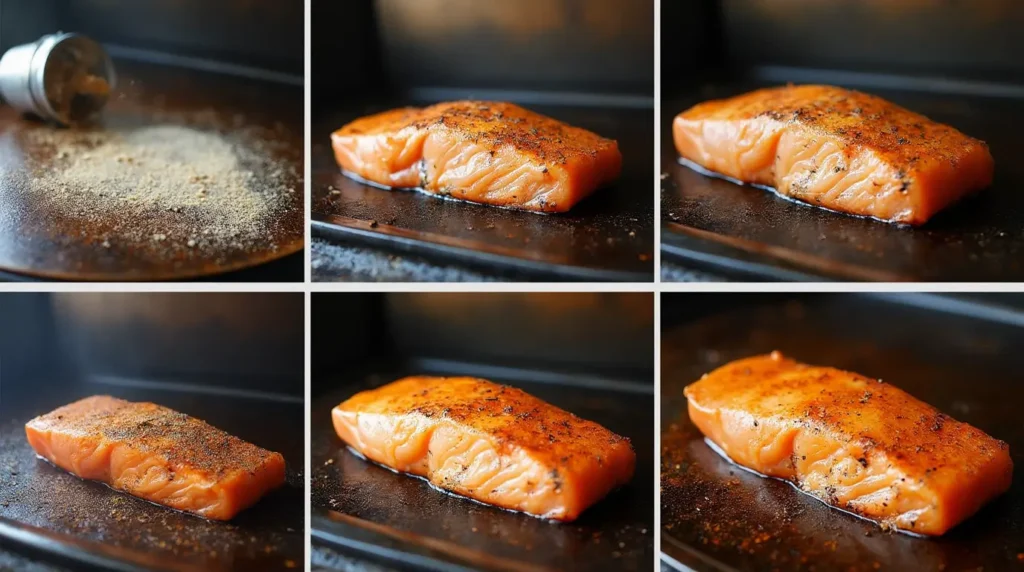
Step 7: Smoke Your Fish (1-3 hours)
Place your fish skin-side down on the rack. For hot smoking (my preferred method for family dinners), maintain a temperature of around 175-200°F. For a stovetop smoker, use your lowest heat setting.
Smoke until the fish reaches an internal temperature of 145°F. The flesh will be opaque and flake easily with a fork. My first few attempts, I relied strictly on time (big mistake). Now I always use a digital thermometer—worth every penny for consistently perfect results.
Step 8: Rest Before Serving (15 minutes)
This step might be the hardest—waiting! But allowing your beautifully smoked fish to rest for about 15 minutes helps the flavors settle and juices redistribute. I usually set the table and finish preparing side dishes during this time to keep myself from sneaking bites too early!
Nutritional Information
Understanding the nutritional profile of smoked fish has become especially important in our house since my husband started watching his cholesterol levels last year. Here’s what you can expect from a typical 3-ounce serving of hot-smoked salmon:
- Calories: Approximately 150
- Protein: 22-25g (this is why I love serving this after the kids’ sports practices)
- Fat: 5-7g (mostly those heart-healthy omega-3s!)
- Sodium: 500-600mg (varies based on curing time)
- Carbohydrates: 0-2g (depending on cure ingredients)
As a blogger who prioritizes balanced nutrition without sacrificing flavor, I love that smoked fish delivers impressive protein while keeping calories reasonable. The sodium content is higher than fresh fish due to the curing process, so I balance our meal with plenty of fresh vegetables and limit other salty ingredients.
One of the nutritional powerhouses in smoked fish is the omega-3 fatty acids, which my doctor specifically recommended for my family. When I smoke salmon at home rather than buying pre-packaged versions, I can control the sodium and avoid unnecessary additives that sometimes sneak into commercial products.
Healthier Alternatives for the Recipe
When my son Jackson developed a sensitivity to refined sugars last year, I had to rethink my traditional cure. After some experimentation, I found that honey or pure maple syrup make excellent brown sugar substitutes in the cure. They create a lovely subtle sweetness that actually lets the fish flavor shine through more clearly.
For those watching sodium intake (like my mother-in-law who visits every summer), I’ve developed a lower-salt cure that uses a combination of salt, potassium chloride salt substitute, and increased herbs and spices to maintain flavor depth. The trick is to reduce the salt by no more than half, or the curing process becomes less effective.
If you’re limiting nitrates in your diet, skip the curing salt (pink salt) that some recipes call for. I’ve found that for home smoking where we’ll consume the fish within a few days, simple kosher salt works perfectly and avoids unnecessary additives.
For a dairy-free cream cheese alternative to serve with your smoked salmon (something I had to figure out when my niece visited with her dairy allergy), try my cashew “cream cheese” spread—soak raw cashews overnight, blend with a little lemon juice and salt, and you’ll have a delicious spread that pairs beautifully with the smoky salmon.
Serving Suggestions
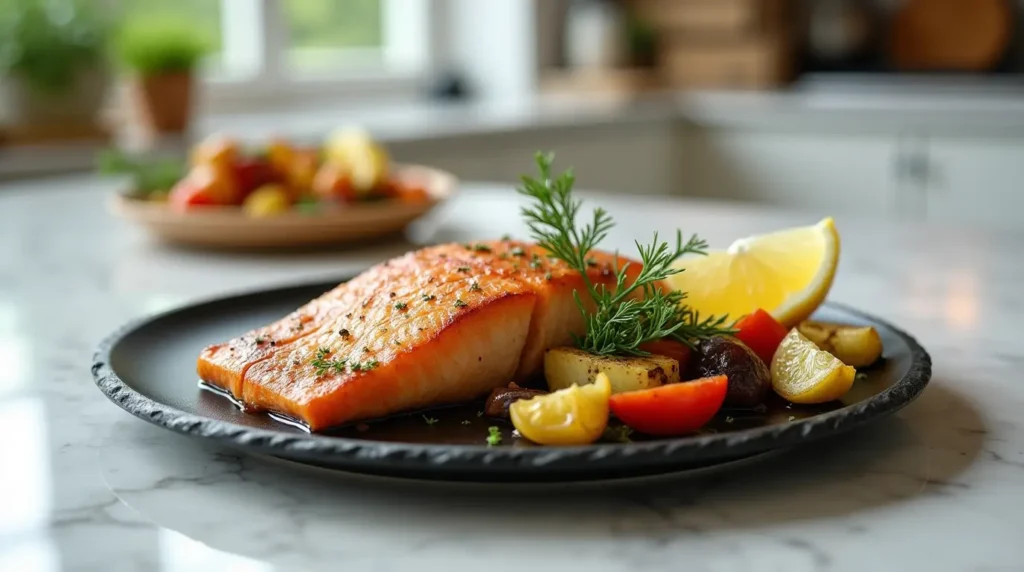
In our house, freshly smoked salmon makes a regular appearance at weekend brunches. I arrange thin slices on a platter with capers, thinly sliced red onions, lemon wedges, and cucumber rounds. Add some toasted bagels and cream cheese (regular and dairy-free options), and everyone can build their perfect bite.
For a more substantial dinner option, I love serving smoked trout warm with a side of roasted fingerling potatoes and a simple arugula salad dressed with lemon vinaigrette. This was the exact meal I prepared for my husband’s promotion celebration last spring, and our guests still talk about it.
During summer, we often enjoy smoked fish as part of a no-cook dinner board—I arrange the smoked fish alongside hard-boiled eggs, snappy fresh vegetables, good mustard, and crusty bread. It’s perfect for those sweltering Chicago evenings when turning on the oven feels like cruel and unusual punishment.
For an elegant appetizer that never fails to impress, I pipe whipped herb cream cheese onto cucumber rounds and top with small pieces of smoked salmon and a tiny sprig of dill. These disappeared in minutes at my daughter’s graduation party!
My personal favorite way to enjoy leftover smoked trout is flaked into scrambled eggs with chives from my garden—a breakfast that makes Monday mornings much more bearable.
Common Mistakes to Avoid
Oh, the smoking mistakes I’ve made! Let me save you from my embarrassing fish failures.
Using too much wood. My first smoking attempt filled our entire house with smoke and set off every alarm. The secret is that a little wood goes a long way—2 tablespoons of chips is often enough for a stovetop smoker. You want gentle, aromatic smoke, not a billowing cloud.
Smoking at too high a temperature. When I tried to rush the process for unexpected dinner guests, I cranked up the heat. The result? Dry, overcooked fish that my husband kindly described as “fish jerky.” Low and slow is the mantra for a reason!
Skipping the pellicle formation. I once tried to streamline the process by skipping the drying time. The smoke slid right off the damp fish, resulting in pale color and minimal smoke flavor. Those extra hours of patience make all the difference in the final product.
Over-curing the fish. The Thanksgiving when I absentmindedly left the salmon curing for 24+ hours, it was almost too salty to eat. Set a timer on your phone to remind you to rinse the fish—lesson painfully learned!
Not removing pin bones. Nothing ruins the luxurious experience of smoked salmon like an unexpected bone. Take the extra few minutes to thoroughly check your fillets, even if they’re labeled “boneless.”
Using old or poor-quality fish. The summer I tried smoking fish that was on its last legs, hoping the smoke would mask any issues—bad plan! Start with the freshest fish possible for results that truly shine.
Storing Tips for the Recipe
Proper storage makes all the difference in maintaining that perfect smoky flavor. After one heartbreaking incident where my beautiful smoked salmon developed an off-taste after just two days (improper wrapping—my fault entirely), I’ve become somewhat obsessive about storage.
For short-term storage (3-4 days), wrap the cooled smoked fish tightly in parchment paper first, then in plastic wrap or a ziplock bag with the air pressed out. Store in the coldest part of your refrigerator, usually the meat drawer or back of the bottom shelf. I label everything with masking tape and a Sharpie—date and type of fish—a habit my husband used to tease me about until it saved him from eating week-old fish!
For longer storage, vacuum sealing is your best friend. We invested in a simple vacuum sealer last Christmas, and it extends the refrigerated life of our smoked fish to about a week. The machine has paid for itself in preserved leftovers alone.
Can you freeze smoked fish? Absolutely! I do it all the time when salmon goes on sale. Wrap tightly in plastic, then foil, then place in a freezer bag. Properly wrapped, it maintains excellent quality for up to three months. I thaw it slowly in the refrigerator overnight rather than using the microwave, which can create hot spots that cook the delicate edges.
One Sunday meal prep trick I rely on: smoking a larger batch of fish than needed, then portioning and freezing the extra for quick protein additions to weekday salads and pasta dishes. Nothing beats the convenience of adding home-smoked salmon to a simple cream sauce for a dinner that tastes like it took hours but comes together in 15 minutes.
FAQs
“Bella, can I smoke frozen fish, or does it need to be fresh?” – Susan from Denver
Great question, Susan! While fresh is ideal, you can absolutely use properly thawed frozen fish. The key is thawing it slowly in the refrigerator (never at room temperature or in hot water). Pat it very dry before curing, as previously frozen fish sometimes releases more moisture. I’ve found that thicker frozen fillets actually work better than thin ones, which can become mushy.
“I don’t have a smoker. Can I still make these recipes?” – Mike from Atlanta
Absolutely, Mike! Before I invested in actual smoking equipment, I created a makeshift smoker using a large, deep roasting pan, a small rack that fit inside, and heavy-duty aluminum foil. Place soaked wood chips in the bottom, position your rack above them, cover tightly with foil, and place over low heat on the stovetop or grill. Just keep the heat low and ensure proper ventilation in your kitchen. I used this setup for years before upgrading!
“How do I know when my fish is smoked enough?” – Taylor from Chicago
Trust your thermometer, Taylor! Unlike some cooking methods where you can go by feel or appearance, smoking is all about reaching that food-safe internal temperature of 145°F. That said, visual cues include a firm texture, slightly deepened color, and flesh that flakes when gently pressed. Start checking smaller fillets after about 45 minutes of smoking at around 180°F.
“Can I use any type of wood chips for smoking fish?” – Jennifer from Portland
Great question about wood chips, Jennifer! Fish has a delicate flavor that can be easily overwhelmed. I recommend sticking with milder woods like alder, apple, cherry, or maple. Avoid mesquite or hickory, which I reserve for bold-flavored meats like brisket. The first time I used hickory with salmon, my kids declared it tasted “like a campfire”—not exactly the culinary compliment I was hoping for!
“My smoked fish turned out too salty. What did I do wrong?” – David from Boston
Been there, David! The most common causes are curing too long or using too much salt in your cure mixture. Remember that thinner fillets need less curing time than thicker ones. If you’ve already over-salted, try soaking the cured fish in cold water for 30 minutes before smoking next time. For really thin fillets, I sometimes reduce the salt by up to 25% compared to standard recipes.
Conclusion
Mastering smoked fish recipes at home has transformed my family’s meals, bringing restaurant-quality flavors to our table with surprisingly little effort. From understanding the importance of that perfect pellicle to choosing the right wood for subtle smoke flavor, these techniques build on each other to create truly exceptional results. Remember that patience is your greatest ally in the smoking process—those extra hours of curing and careful temperature monitoring make all the difference.